We use cookies to improve the services we offer you. By continuing to browse this site, you consent to keep them in accordance with our Privacy Policy.
×We use cookies to improve the services we offer you. By continuing to browse this site, you consent to keep them in accordance with our Privacy Policy.
×
 90
90
 8 min
8 min

Knowing how to fade out music in iMovie – making a song gradually lower to silence rather than cutting off abruptly – is one of the most-searched audio editing tasks for Mac users. iMovie on a Mac has two different methods to achieve this: fade handles directly on the waveform and the Project Settings instant auto-fade checkboxes.
Fade handles are the quickest way to fade audio in iMovie. They appear as circular handles at the start and end of any audio clip when you hover over it in the timeline. Read on to learn how to fade audio in iMovie.
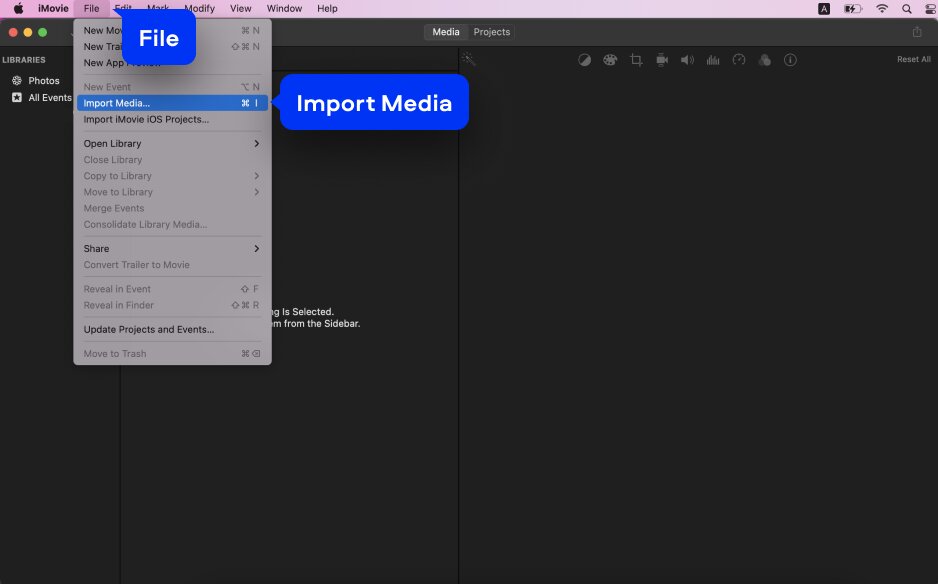
Open iMovie on your Mac and open or create a project. Click File > Import Media to import your video and music files, or drag them directly into iMovie. To add a song to the background music well, drag the audio file to the green music track at the very bottom of the timeline. For music attached to a specific clip, drag the audio below the video clip – a green anchor line appears connecting them.
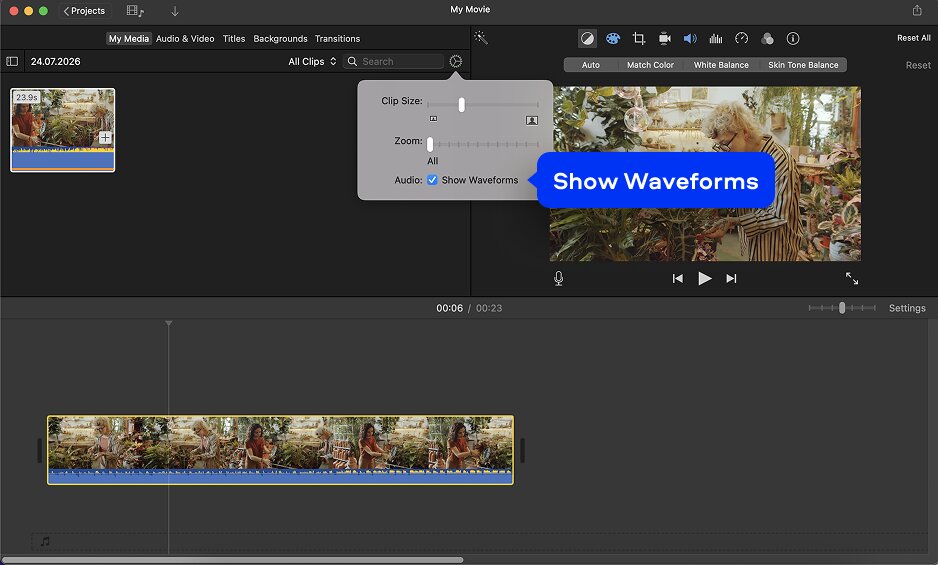
To see the fade handles, you may need to enable waveform display. Click the Settings button, or go to View > Show Waveforms. The audio track expands to show the sound waveform. The fade handles – small circles at the start and end of the clip – are now visible.
iMovie accepts these audio and video formats for editing:
| MP3 – most common music format, fully supported |
| M4A (AAC) – Apple’s standard music format, unprotected tracks |
| WAV (PCM) – lossless, large files |
| AIFF / AIF – Apple’s lossless audio format |
| CAF (Core Audio Format) – Apple-native |
| MP4 video files (audio track fade applies to embedded audio) |
| MOV, M4V (audio track fading supported in video clips) |
| GarageBand projects (via Audio browser > GarageBand tab) |
| NOT supported: DRM-protected Apple Music streams, Spotify tracks |
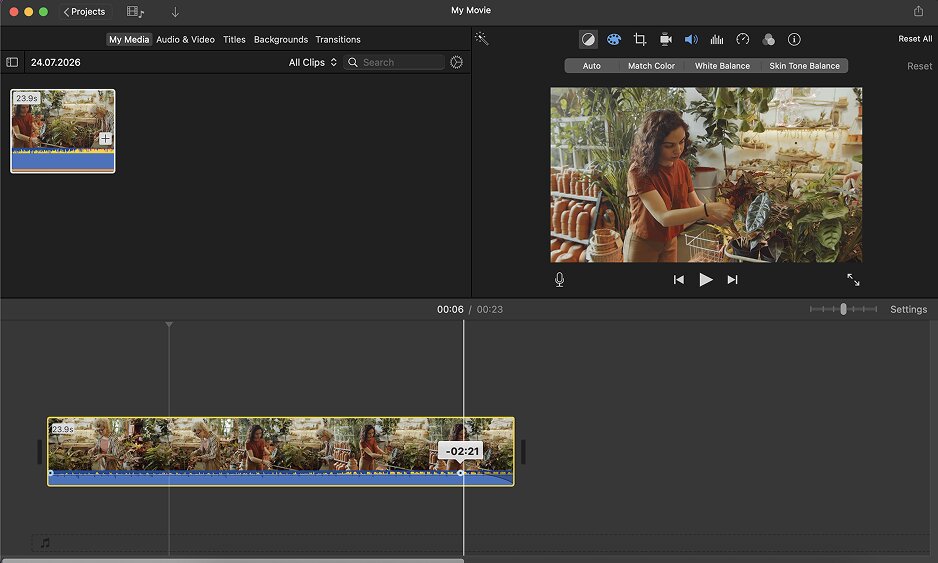
Hover your pointer over the audio track in the timeline until the two circular fade handles appear. To create a fade out: drag the right-side handle (at the end of the clip) inward to the left – toward the center of the clip. As you drag, a slope visual appears in the waveform showing where the volume will begin decreasing. The further inward you drag, the longer the fade. To create a fade in, drag the left-side handle (at the start of the clip) inward to the right.
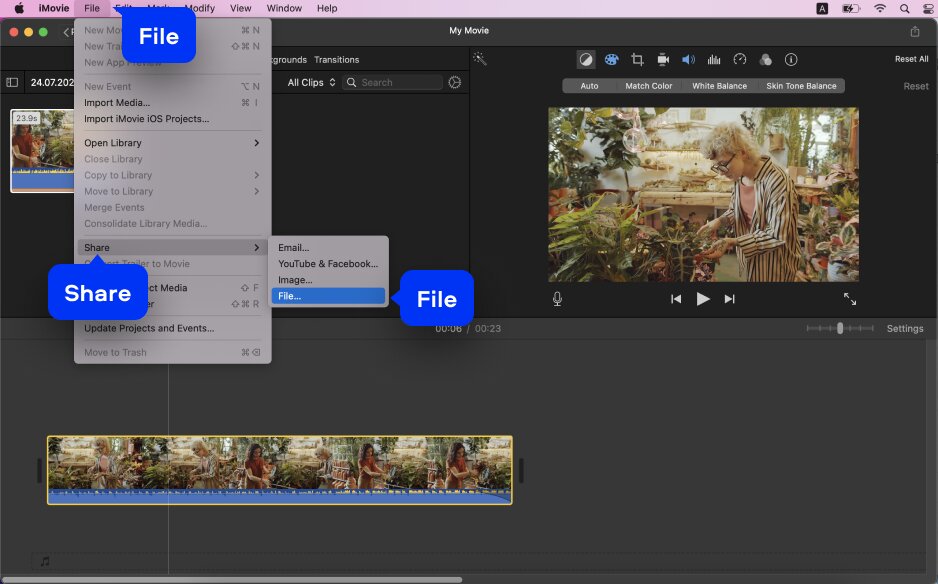
Click a few seconds before the fade-out begins and press spacebar to preview the audio transition. If the fade is too short or too long, drag the handle to adjust. When it sounds right, click File > Share > File, choose MP4, set resolution, and save.
| Blend tip: to blend music smoothly between two clips, overlap an audio fade-out on the first clip with an audio fade-in on the second. This creates a natural cross-fade – iMovie doesn’t have an automatic cross-fade tool for audio, so this manual handle method is the only way. |
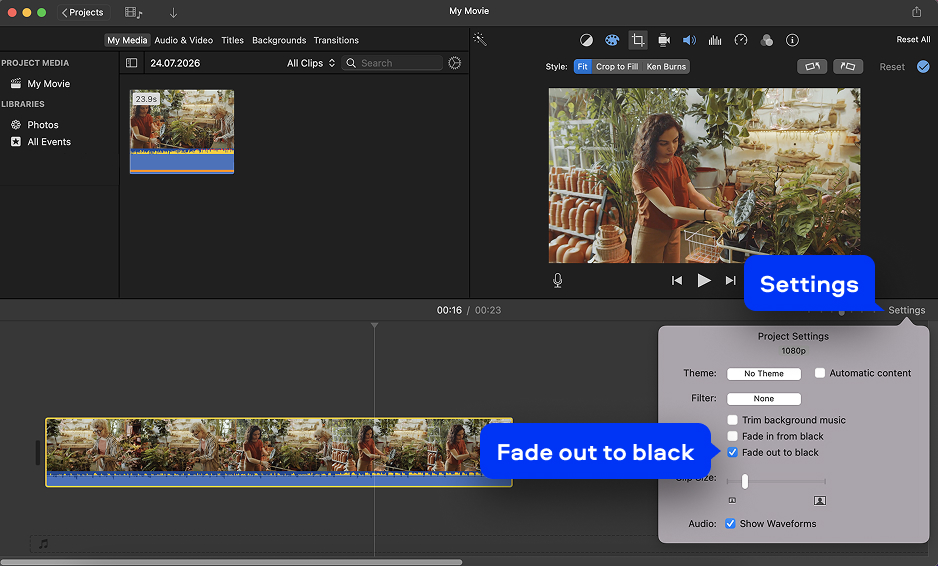
Here’s how to fade music in iMovie on the entire project. Click the Settings button below the preview window in iMovie. A settings panel appears with two checkboxes: Fade in from black and Fade out to black. Checking Fade out to black applies an automatic audio and video fade-out at the very end of the entire project. This is the fastest option but gives you no control over timing or which clip is affected.
| MP4 (H.264 or H.265) – default, recommended for sharing |
| MOV (ProRes) – high quality via Export File > ProRes |
| 4K, 1080p, 720p, 480p – resolution presets |
| Direct upload to YouTube, Vimeo, Facebook via Share menu |
| Note: audio fades are baked permanently into the exported video file |
| Note: iMovie cannot export audio-only files – use GarageBand for that |
Movavi Video Editor is the cross-platform software alternative for fading audio that works on both Mac and Windows PC. It offers per-clip Fade in / Fade out sliders in the settings panel, a visual volume envelope with draggable keypoints for manual fade curves, and other useful audio-editing features.
Movavi Video Editor handles audio fade on every type of clip uniformly – background music, voiceover, and sound effects – through the same panel. You can check all the features for free with a 7-day free trial. The paid version removes the watermark and all limitations.
| 🏷️ Save on Movavi Video Editor
Use a promo code for a discount on your license. Check current promo code → |
Three steps from import to a perfectly faded audio export on your Mac or PC.
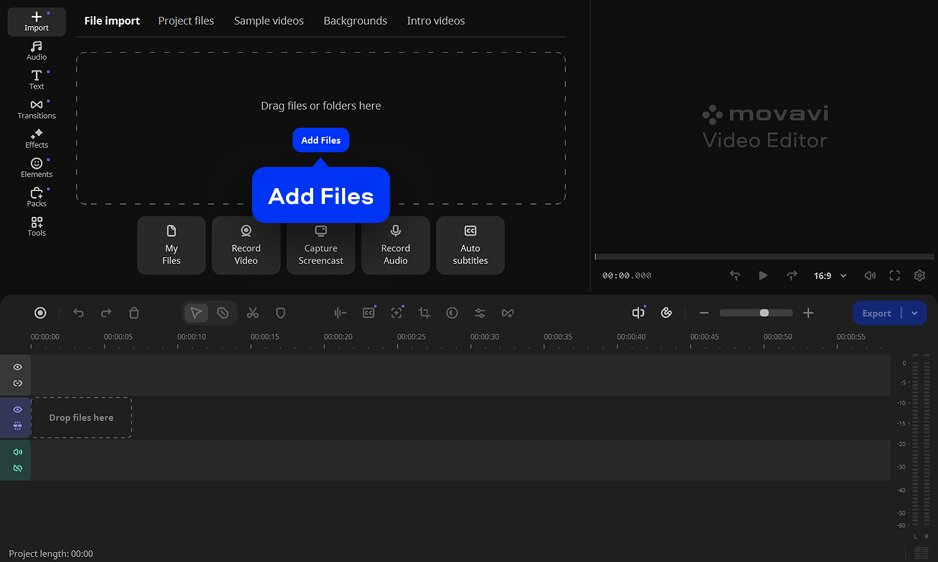
Download and install the app. Click Add Files and import a video you want to fade. Drag your file onto the Timeline.
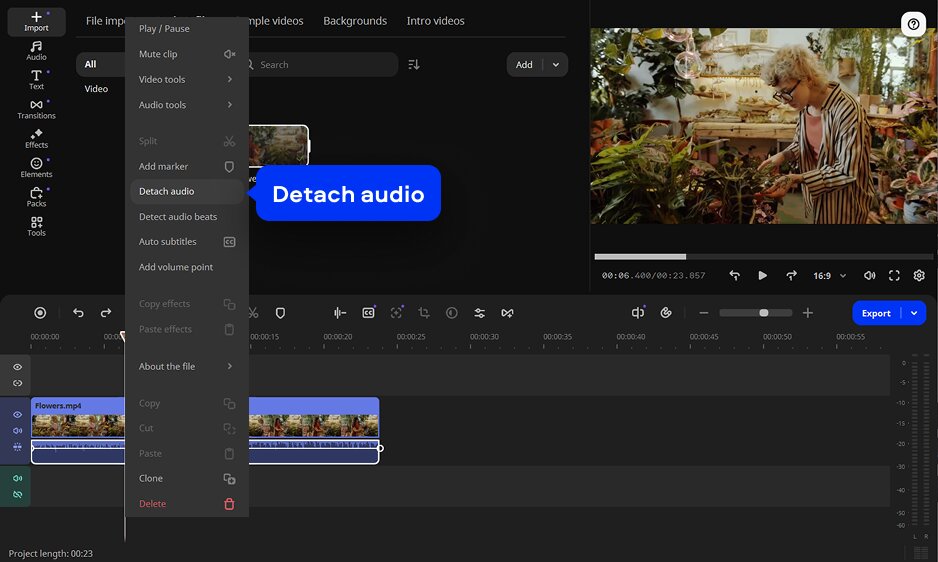
To apply a fade out effect only to the audio track, separate video and audio by right-clicking on the audio track on the timeline and select Detach audio.
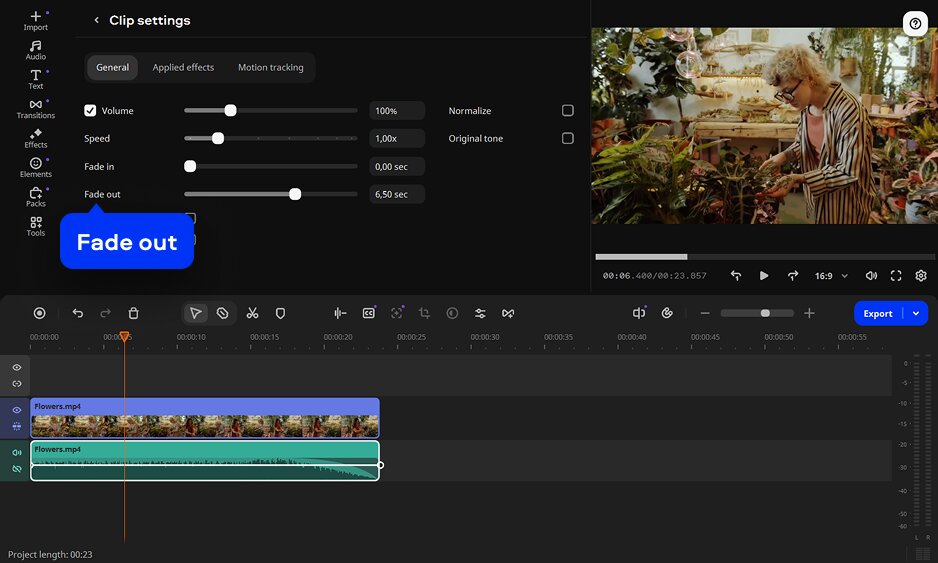
Then, double-click the audio track to open the Clip settings tab. You’ll see a Fade in and a Fade out sliders. Move the Fade out slider – Movavi automatically applies a smooth fade-out to the end of the clip. You can adjust the duration of the fade out as you need.
Step 3. Export the video
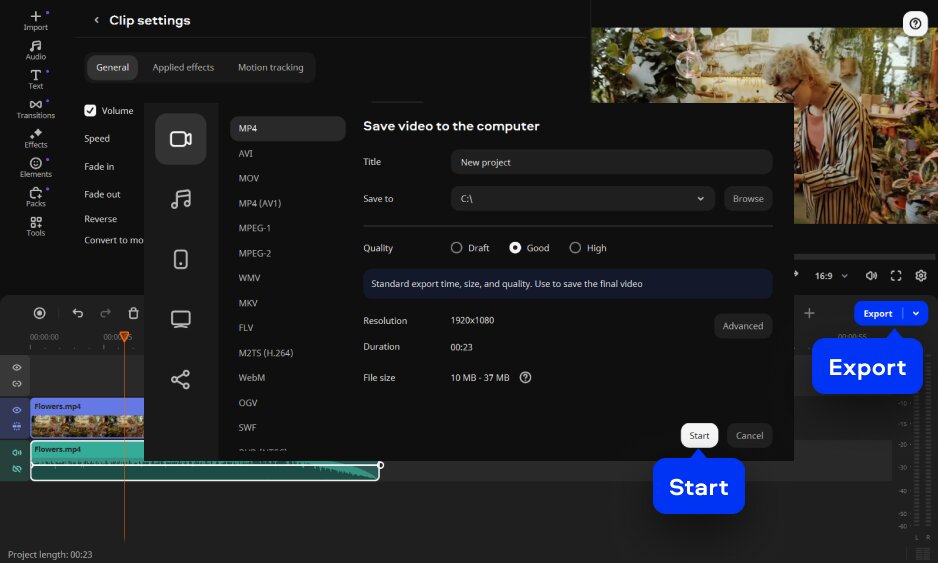
Click Export, choose the target format, set resolution and export location, and click Start. The exported video includes the faded music permanently mixed into the audio track.
Fading out music in iMovie on a Mac takes under a minute with the fade handle method – hover over the audio clip to reveal the handles, then drag the right-side handle inward for a smooth fade out. The Audio Inspector gives you numeric precision for any specific duration, and the Project Settings instant auto-fade is the fastest option for a whole-project fade.
For a cross-platform tool with per-clip fade controls, volume keyframes, audio ducking, and Windows PC support, Movavi Video Editor covers every audio fade scenario in one download.
To blend music in iMovie – meaning create a smooth crossfade between two songs or audio clips – use the fade handles on both clips. On the first clip, drag the right-side fade handle inward to create a fade out. On the second clip, drag the left-side fade handle inward to create a fade in. Overlap these two fade regions in the timeline by extending the first clip’s fade slightly and starting the second clip’s audio slightly before the first clip ends. This creates a manual cross-fade that blends the two songs together. iMovie doesn’t have a dedicated audio cross-fade tool – this manual handle approach is the standard workaround.
To gradually lower music in iMovie:
To fade background music in a video using iMovie: if the music is in the green background music track at the bottom of the timeline, hover over it and drag the right-side fade handle inward. The fastest whole-project option: click the Settings gear icon > check Fade out to black – this applies an automatic fade to both video and audio at the project’s end. For background music that needs to fade under a voiceover (not just at the end), use volume keyframes by right-clicking the audio track and adding volume control points manually.
The fade handles method also works per-clip: hover over just that clip, then drag the right-side handle inward. Unlike Project Settings auto-fade (which affects the whole project), the handle method gives you clip-level control.