We use cookies to improve the services we offer you. By continuing to browse this site, you consent to keep them in accordance with our Privacy Policy.
×We use cookies to improve the services we offer you. By continuing to browse this site, you consent to keep them in accordance with our Privacy Policy.
×
 106
106
 12 min
Learning how to add music to iMovie on a Mac is one of the first things new editors want to do – and it’s easier than most expect. iMovie supports three sources: your Music library, local audio files you import from Finder, and a built-in library of free sound effects and theme music for iMovie. All three are available directly inside the app at no extra cost.
The one common stumbling block: Apple Music streaming tracks are DRM-protected and can’t be imported directly – only songs you’ve downloaded or purchased from iTunes work. This guide covers all three working methods in full and explains the Apple Music and Spotify situation.
This method pulls songs directly from the Music app on your Mac. It works for songs you’ve purchased from the iTunes Store and local audio files you’ve added to your Music library. Apple Music streaming-only tracks are grayed out and not accessible.
Open iMovie on your Mac and create a new project or open an existing one. With your project open in the timeline, look at the browser area at the top of the window. Click the Audio & Video tab (or just Audio depending on your iMovie version). A sidebar with media categories appears on the left.
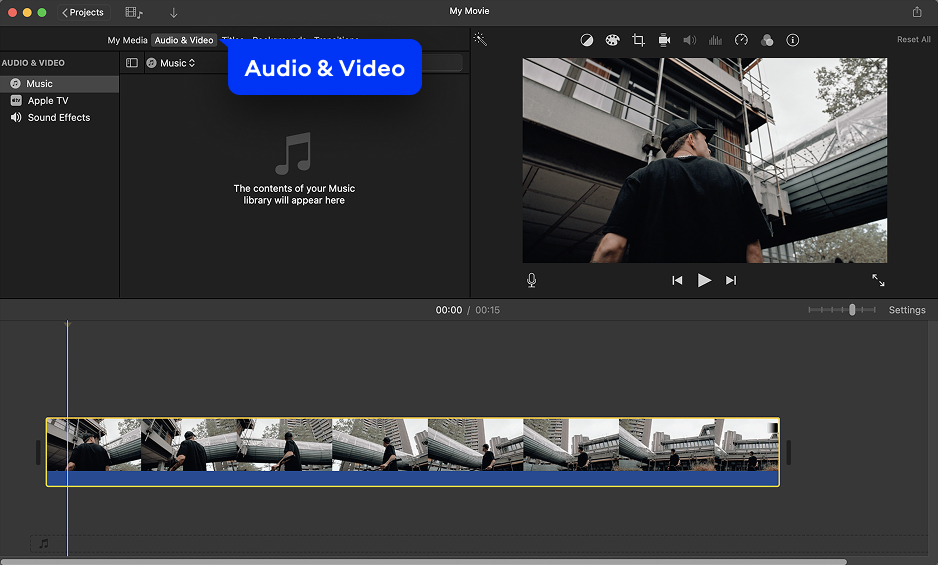
In the sidebar, click Music to browse your Music app library. Your songs, playlists, and albums appear in the browser panel on the right. Click the play button next to any song to preview it. You can also click in the waveform at the top of the browser and press spacebar to start and stop playback. If a song is grayed out, it means it’s an Apple Music stream-only track that hasn’t been downloaded as a local file.
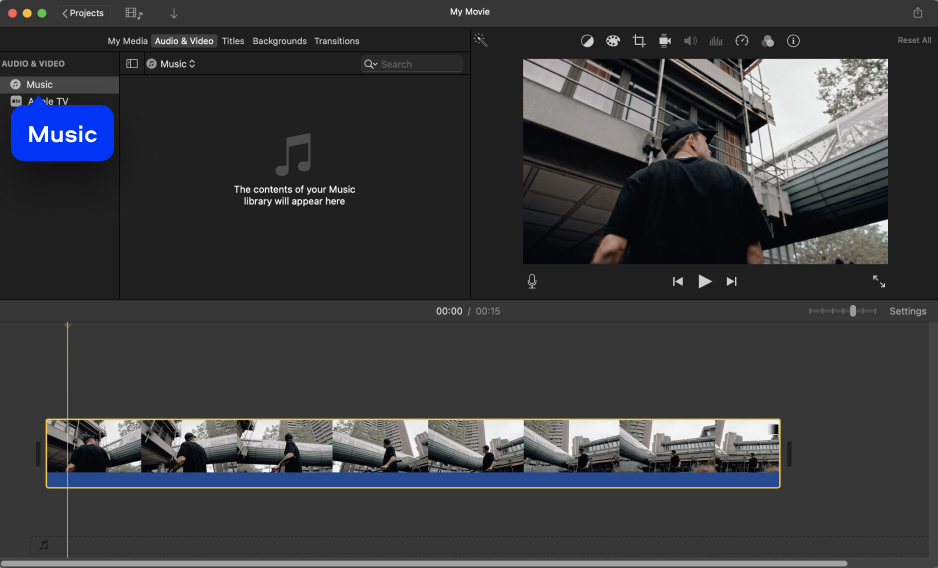
Drag the song from the browser to the timeline. For background music, drag it to the music well at the bottom of the timeline (indicated by the musical note icon). This keeps the track pinned as background audio that won’t move when you rearrange video clips. To attach music to a specific video clip, drag the track under the video clip until a connecting bar appears; the music will move with that clip if you relocate it.
| Partial song tip: to use only part of a song, select a range in the waveform at the top of the browser (it shows a yellow border), then drag just that range to the timeline instead of the full track. |
If you have a music file saved on your Mac – an MP3 you downloaded from a royalty-free site, a WAV file you recorded yourself, or a track from a purchased album – import it via the menu. Click File > Import Media at the top of the screen. In the Finder window that opens, navigate to your audio file, select it, and click Import Selected. The file appears in your iMovie project’s media browser.
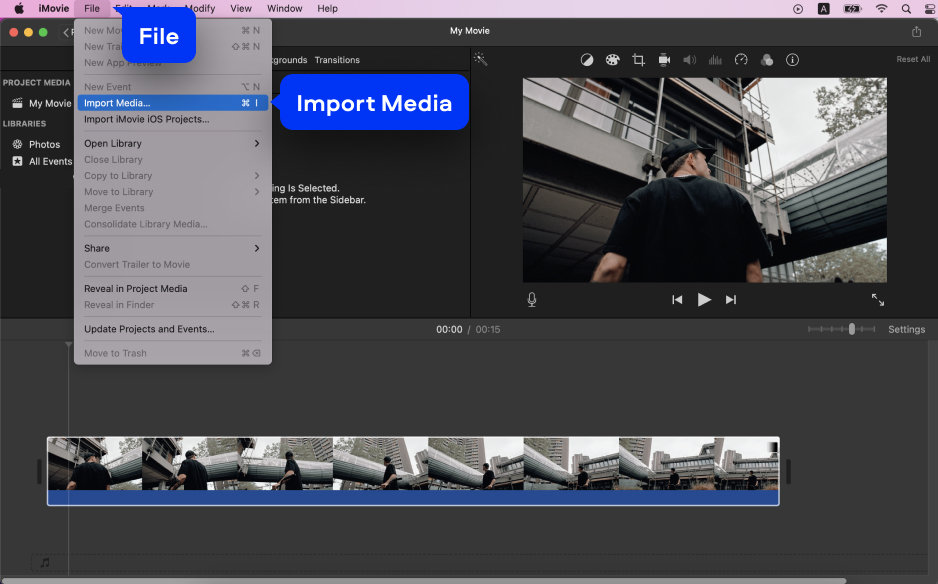
Once the music file appears in your project media, drag it from the media browser to the timeline. Alternatively, you can drag the audio file directly from the Finder straight onto the timeline – iMovie imports it automatically when you drop it. Drop it onto the music well for background music, or drop it under a specific clip to attach it to that video segment.
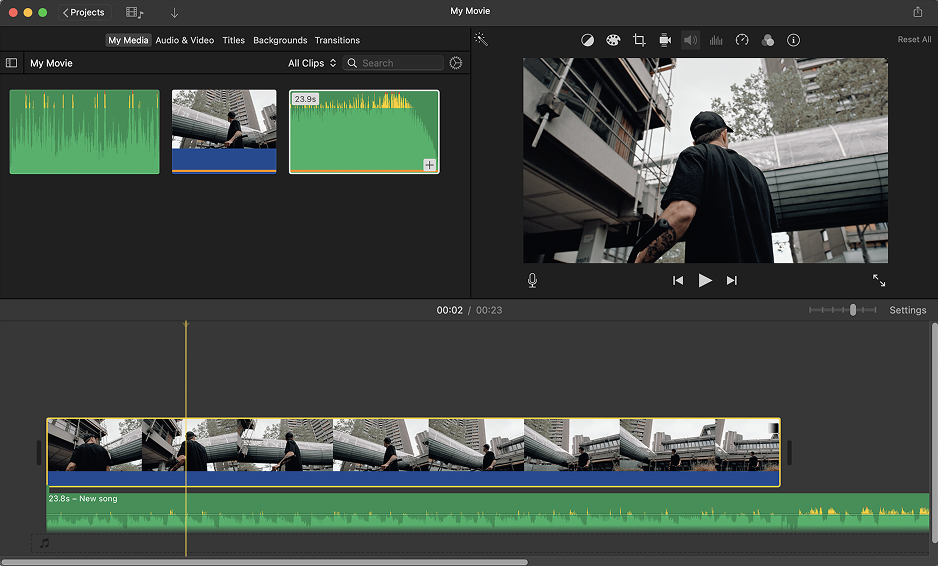
iMovie accepts the following audio formats for import. Files in unsupported formats need to be converted before they can be added to a project.
| MP3 – most common, widely supported |
| M4A (unprotected AAC) – standard Apple format for purchased iTunes tracks |
| WAV (PCM audio) – lossless, large files |
| AIFF / AIF – Apple’s lossless audio format |
| CAF (Core Audio Format) – Apple-native |
| MP4 (audio track only) – supported for audio extraction |
| GarageBand projects – accessible via the GarageBand section in the Audio browser |
| Not supported: DRM-protected Apple Music streams (M4P), Spotify tracks, YouTube audio (without conversion) |
iMovie ships with a library of royalty-free music for iMovie and hundreds of sound effects that you can use in any project for free. In the Audio & Video browser, look in the sidebar for Sound Effects and Theme Music sections. Browse the categories – Ambience, Animals, Foley, Jingles, Technology, and more. Click the play button next to any track to preview it, then drag it to the timeline.
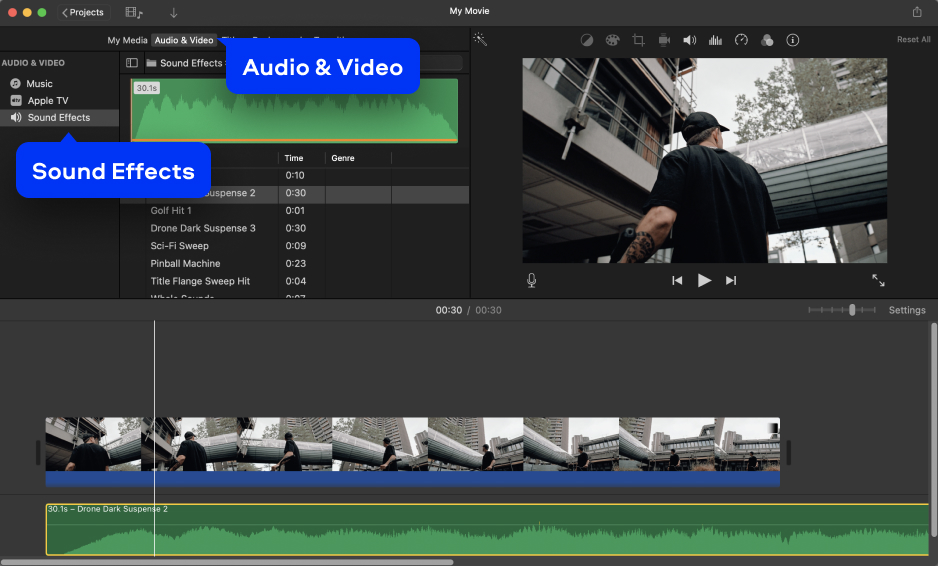
| 📌 Auto-fit tip: theme music in iMovie automatically adjusts its length to match your video’s duration when you drag it to the background music well – no manual trimming needed. |
Once you’ve added music and finished editing, iMovie exports your project as a video file with the audio permanently mixed in.
| MP4 (H.264 or H.265) – default export format, widest compatibility |
| MOV (QuickTime) – native Apple format, high quality |
| 4K / 1080p / 720p / 480p – resolution options at export |
| Direct export to YouTube, Vimeo, Facebook, and Email (built-in share sheet) |
| Apple ProRes (via File > Share > Export File, high-quality option) |
| Audio-only export: not directly supported – use GarageBand or QuickTime Player |
This is the most common source of confusion when people search for how to add music to iMovie on a Mac. Here’s the honest breakdown:
✅ iTunes/Music Store purchases: these appear in your Music library and can be added to iMovie directly. You must be the copyright holder or have permission to use purchased tracks in published videos.
❌ Apple Music subscription tracks: these are DRM-protected M4P files. Even if downloaded for offline playback, they appear grayed out in iMovie and cannot be imported. Workaround: use a DRM-removal tool to convert them to MP3 first (check local copyright laws).
❌ Spotify tracks: Spotify doesn’t allow downloading tracks as audio files. You cannot directly import Spotify music into iMovie. Workaround: use a screen recorder or Spotify recording tool to capture the audio, convert to MP3, and import the file (check Spotify’s Terms of Service and your local copyright laws before doing this).
✅ Royalty-free music from sites like HookSounds, Epidemic Sound, Artlist, Free Music Archive, Pixabay Music: download the MP3 or WAV file and import it via File > Import Media. These are the cleanest options for published content..
Movavi Video Editor is the practical cross-platform alternative for adding music to videos on both Windows PC and Mac. It includes a built-in royalty-free music library, accepts every common audio format (MP3, WAV, M4A, AIFF, Ogg, and more), and has per-clip volume controls, fade in/fade out, audio ducking, and a noise removal tool – all in a single timeline interface.
Unlike iMovie, Movavi works on both PC and Mac, handles audio and video editing in the same project, and exports to 60+ formats without any platform restrictions. The 7-day free trial gives full access to every music and audio feature before any payment.
| 🏷️ Save on Movavi Video Editor
Use a Movavi promo code at checkout and save on your license. Check current promo code → |
Four steps from a video file to a finished export with a perfectly synced soundtrack on your Windows PC or Mac.
Download and install Movavi Video Editor for Windows or Mac. Open the app, click Add Files, and upload your video file. Drag it from the Project files panel onto the Timeline at the bottom of the window.
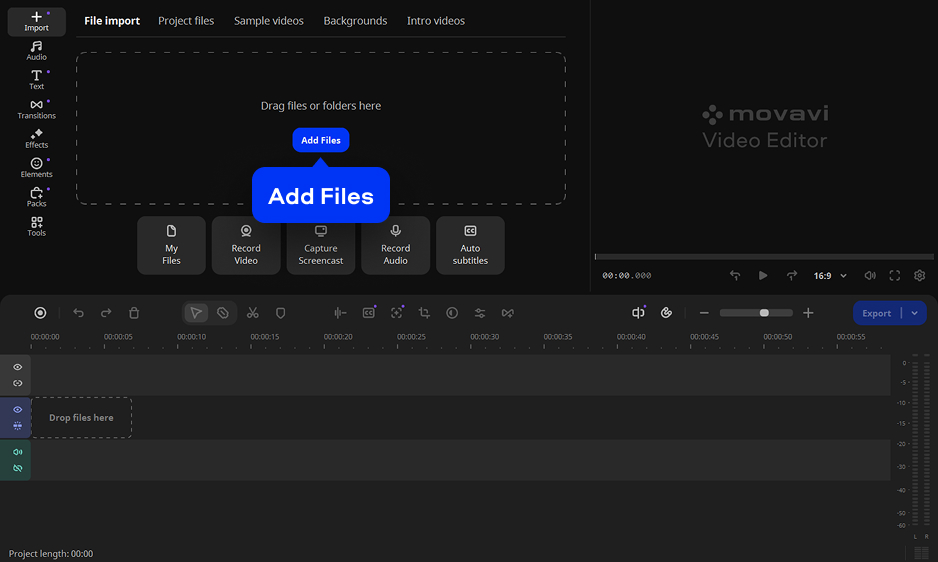
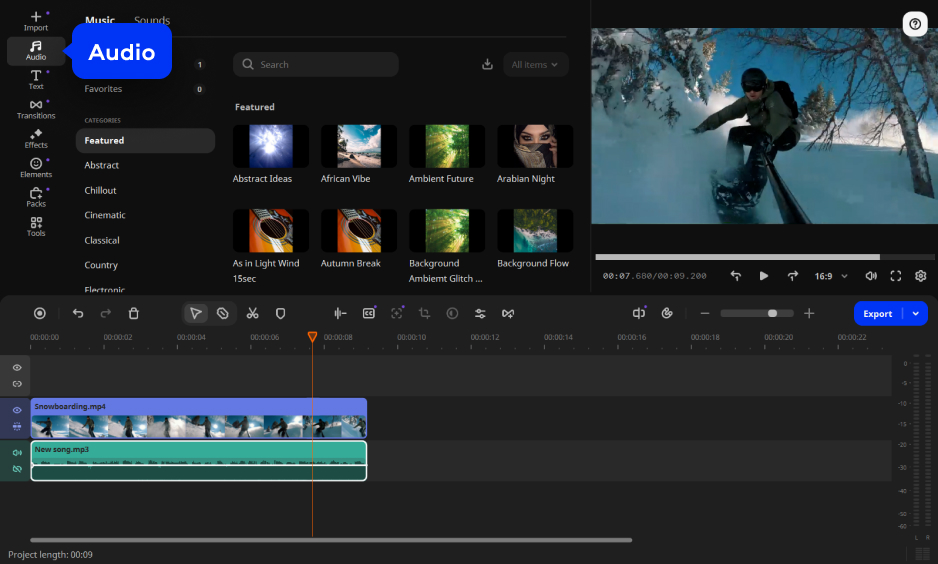
To add your own music file, click Add Files again, select your MP3, WAV, or other audio file. Drag it to the audio track on the Timeline below the video. To use the built-in royalty-free library, open the Audio tab in the left panel, browse by mood or genre, preview tracks, and drag the one you want onto the Timeline.
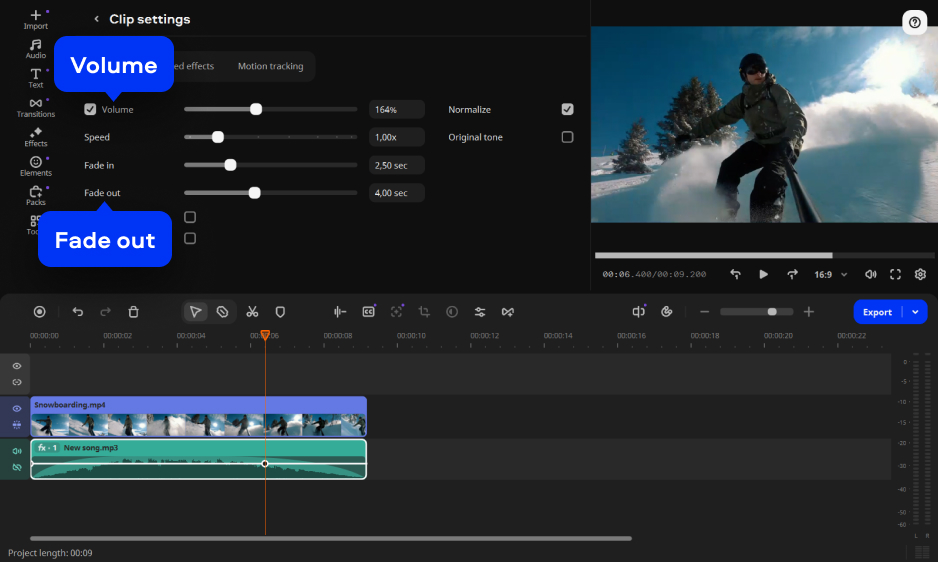
Double-click the audio track on the Timeline to open the Clip settings panel. Drag the Volume slider to balance the music level against any original video audio. Move Fade in and Fade out sliders to add smooth transitions at the start and end of the track. Trim the audio clip by dragging its edges on the Timeline to match the video length.
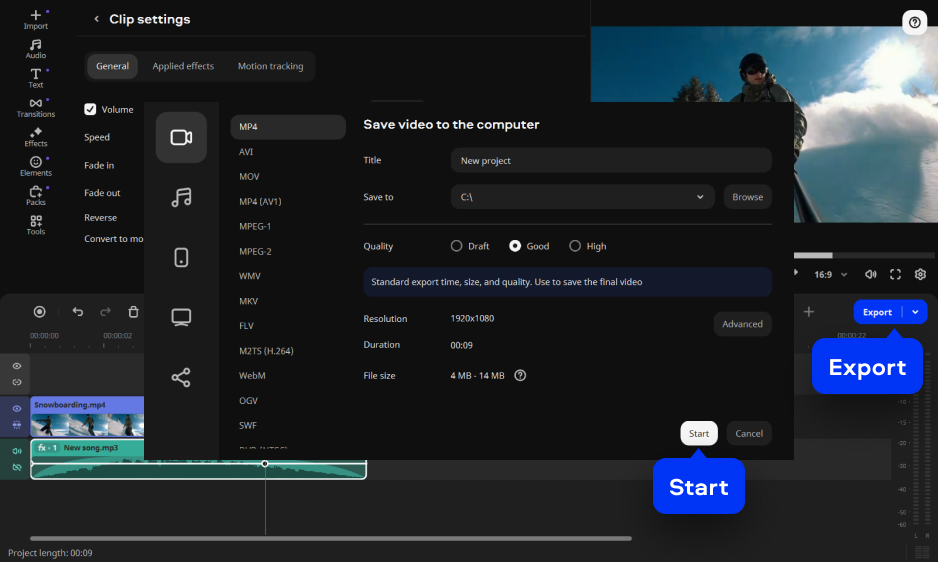
When the video and music are synced in the preview, click Export. Choose your output format (MP4 is recommended for the widest compatibility), set resolution and quality, pick a save location, and click Start. Movavi renders the video with the music permanently mixed into the audio track and saves the finished file to your PC or Mac.
| ▶️ Video tutorial – Movavi channel
How to add and enhance sound in your video in Movavi Video Editor 10 Audio Tricks: Enhance Video Sound & Music – Beginner’s Guide |
Adding music to iMovie on a Mac is fast once you know which method to use. The audio browser handles your music library and built-in tracks in seconds. Importing media option covers any local MP3 or WAV file you’ve downloaded. The built-in sound effects and theme music library provides a free, always-available option that auto-fits to your project length.
For a cross-platform option that works on both Windows PC and Mac, Movavi Video Editor handles music for any video in a flexible timeline with a royalty-free library, volume controls, fade tools, and popular export formats. Try the free trial and add your soundtrack today.
The best sources for music for iMovie that you can download and use legally:
All of these provide MP3 or WAV files you can download and import into iMovie via File > Import Media. iMovie’s own built-in music library is also free and available directly in the Audio tab – no download needed.
Our recommended audio source for iMovie:
HookSounds: The platform offers a large library of original royalty free music with clear licensing terms aswell as free music for non-commercial use – either via a subscription or single license downloads.
The files come in MP3 or WAV which you can import into iMovie via File > Import Media.
To add background music in iMovie:
You can also drag an MP3 or WAV file directly from Finder to the music well without going through File > Import Media first.
Yes – iMovie music is available for free in several ways. iMovie ships with a built-in library of theme music and hundreds of sound effects at no cost, accessible in the Audio browser under Sound Effects and Theme Music. You can also use any audio file from your own Music library if you purchased or own it. For a wider selection of free tracks without copyright concerns, royalty-free sources like Pixabay Music and Free Music Archive offer downloadable MP3 files at no charge. iMovie itself is also free – it comes pre-installed on every Mac. The only limitation is Apple Music subscription tracks, which are DRM-protected and can’t be imported directly.
There is no direct way to import a Spotify track into iMovie. Spotify’s download feature saves tracks for offline playback within the Spotify app only – the files are DRM-protected and not accessible to other apps.
The workaround most people use:
Important: always check Spotify’s Terms of Service and your local copyright laws before recording or distributing content made with Spotify tracks. For published videos on YouTube or social media, using licensed royalty-free music from sites like Epidemic Sound is a significantly safer option.