Get Movavi Screen Recorder with a 30% discount!
We use cookies to improve the services we offer you. By continuing to browse this site, you consent to keep them in accordance with our Privacy Policy.
×
 9,328
9,328
 13 min

No other medium is more effective than the webinar for creating leads, establishing your personal brand, or having an impact in your niche. Before jumping in and hosting a webinar, you do need to do some groundwork on best practices, how to do a webinar, how to plan it, and navigate around any challenges to increase your chances for a successful online event.
If you’ve missed the boom in e-learning, here’s our short explanation of the term “webinar”. As you might guess from the name, a webinar is a web seminar – a class or a workshop that is conducted online. Webinars can be whether live or recorded for later distribution.
As opposed to offline lectures and workshops, webinars are easy to create and host. Also, you’ll attract 50 people to an online event much more quickly than 50 guests to an offline seminar. That’s why webinars are so popular, and they are even more popular now, during the time of COVID.
A webinar can literally be on any topic as long as it’s interesting for the audience. It’s not just professional lecturers and presenters who create their own successful online seminars, but also brands, bloggers, and influencers. On the internet, you can find all kinds of webinars – everything from the history of anime to homebuilding.
So you see, if you have something new to tell to your audience, and it takes more than one article to explain it, you should definitely consider conducting a webinar!
For brands, webinars are a great marketing tool. When done correctly, they can increase audience loyalty, generate tons of leads, and generally build the brand. During the event, people can interact directly with representatives of the brand, which establishes trust among viewers. Basically, it’s approximately an hour’s-worth of one-to-one time with your core audience. What else do you need to sell your product?
If you’re not convinced yet, stats will do that better than any words. Almost 60% of marketers are already using webinars as a promotion tool. Why? Because, according to studies, up to 40% of attendees become qualified leads after watching a webinar from a company. And between 2% and 5% of attendees eventually buy something from the brand that organized the webinar.
For many bloggers, on the other hand, webinars are the type of information product that helps them increase their income and stop depending so much on brand partnerships. As a result, they can be more creative and free on their blogs, which their followers are generally happy to see.
The first step is to define a topic for your webinar. Your goal is to find something that will attract as many viewers as possible.
Have you noticed that your followers ask the same questions over and over again? Identify people’s pain points behind those questions and find experts who can give comprehensive answers to them. Another way to find that one thing that touches your audience the most is to analyze all of your posts and identify the most popular and/or controversial ones.
The bottom line is that you have to find something interesting and useful for your viewers. It has to be something that will help them to change their personal or working lives for the better, not something they can Google in 15 minutes. If this kind of idea does not leap to mind, you probably need to explore other tools to reach your goal.
Once you’ve found the topic for your webinar, you can start gathering information for your online event.
Want to do more than just one webinar? Read how to create an online course.
Preparing a webinar is a lot like preparing a presentation. You need to gather all the information related to your topic from all possible angles and that will give the most comprehensive answers to the main questions raised by the event.
After you have all your sources, process them, and give some structure to your presentation. Follow a simple structure that consists of the introduction, the body, and the conclusion.
The first part is for describing the topic and introducing the speaker. In the second part, you want to break down all the material you have into short, clear points. That way, it will be easier for your attendees to follow.
To help you keep your notes organized, here are some great tools:
Usually, webinars fall within the 30- to 60-minute range, but it all depends on the topic. The optimal length of your webinar is the one that lets you cover your subject completely, but won’t bore your viewers.
There’s one thing you should remember, though. If, during your preparations, you realize that your presentation is going to take less than 15-20 minutes, probably you need to reconsider your approach and find some more interesting info to share. Or maybe you don’t need a webinar at all and you can just make a video to answer the questions instead.
On the other hand, if you see that the webinar is going to be longer than 2 hours, consider breaking it down into a series of webinars.
When planning, keep in mind that you’ll need approximately 10 minutes at the beginning of the session for introductions and dealing with housekeeping issues around your presentation technology. Also, you’ll want to save 15-20 minutes at the end of the session for Q&A.
A webinar series is more than just a string of webinars centered around a topic. Like a TV series, a webinar series will require that each episode maintains a certain level of consistency. Each session should be of a similar length, and the same host should be leading each episode. Graphics that maintain the same look and feel will tie each of the episodes together while increasing the branding power of each event.
When considering webinar best practices, the question of whether to appear on camera will no doubt crop up. There’s no simple yes or no answer but here are few things to consider which should help you decide:
Arguments for appearing on camera include:
A camera may not be the best idea if:
You are going to be busy during your webinar, so you won’t have time to focus on how well you are presenting on camera. As you talk, check your notes, and review your audience feedback, you’ll find it a challenge to maintain a relaxed, friendly look.
A good compromise may be to introduce the webinar while on camera and then switch to presentation mode during the main part of the session. You can then come back on camera towards the end to wrap up the event or answer questions from the audience.
Webinars can be a useful resource, not just for those who attend but also for those who were not able to participate in the live session, by creating the webinar as a downloadable resource. Most webinar software will have the option to record the webinar directly to the hard disk as a movie file.
If you don’t want your webinar to go live then, instead of complicated platforms, you can use simple screen recording software. For example, Movavi Screen Recorder.
Movavi Screen Recorder is an application that can record all screen activity such as screenshots, online job interviews, Skype calls, and PowerPoint presentations, to name just a few. The functionality of Movavi Screen Recorder extends well beyond capturing webinars. Added convenience comes in the form of having over 20 export video formats.
We’ve recently updated the program and added some cool new features. For example, now you can turn off the video recording and capture only the system sounds of your computer and your voice. This could be useful when you need to edit the audio track of your webinar but don’t have time to redo the whole thing.
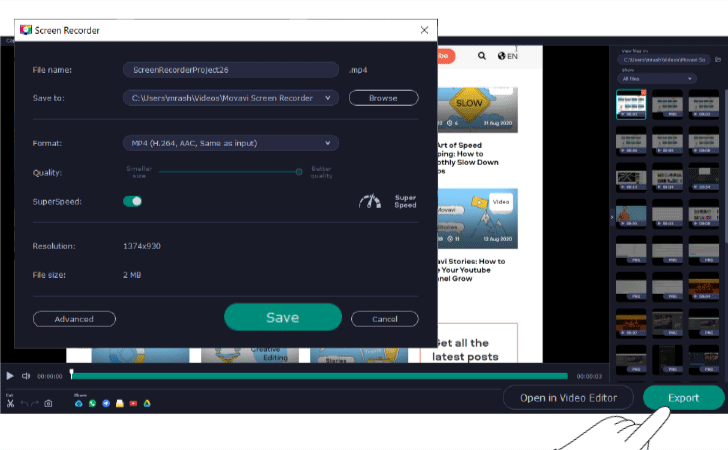
Here’s how to use the software to record a webinar:
1. Install the program on your computer and launch it.
2. In the right-hand menu, click the video camera button. If you need to activate the sounds-only feature, hit + at the bottom of that menu and select Audio recording.

3. Select the area you want to record.

4. Use the toolbar in the corner to adjust the sound recording settings.
5. Turn on the web camera by clicking the cam button in the toolbar.
6. Press the red button to start recording.
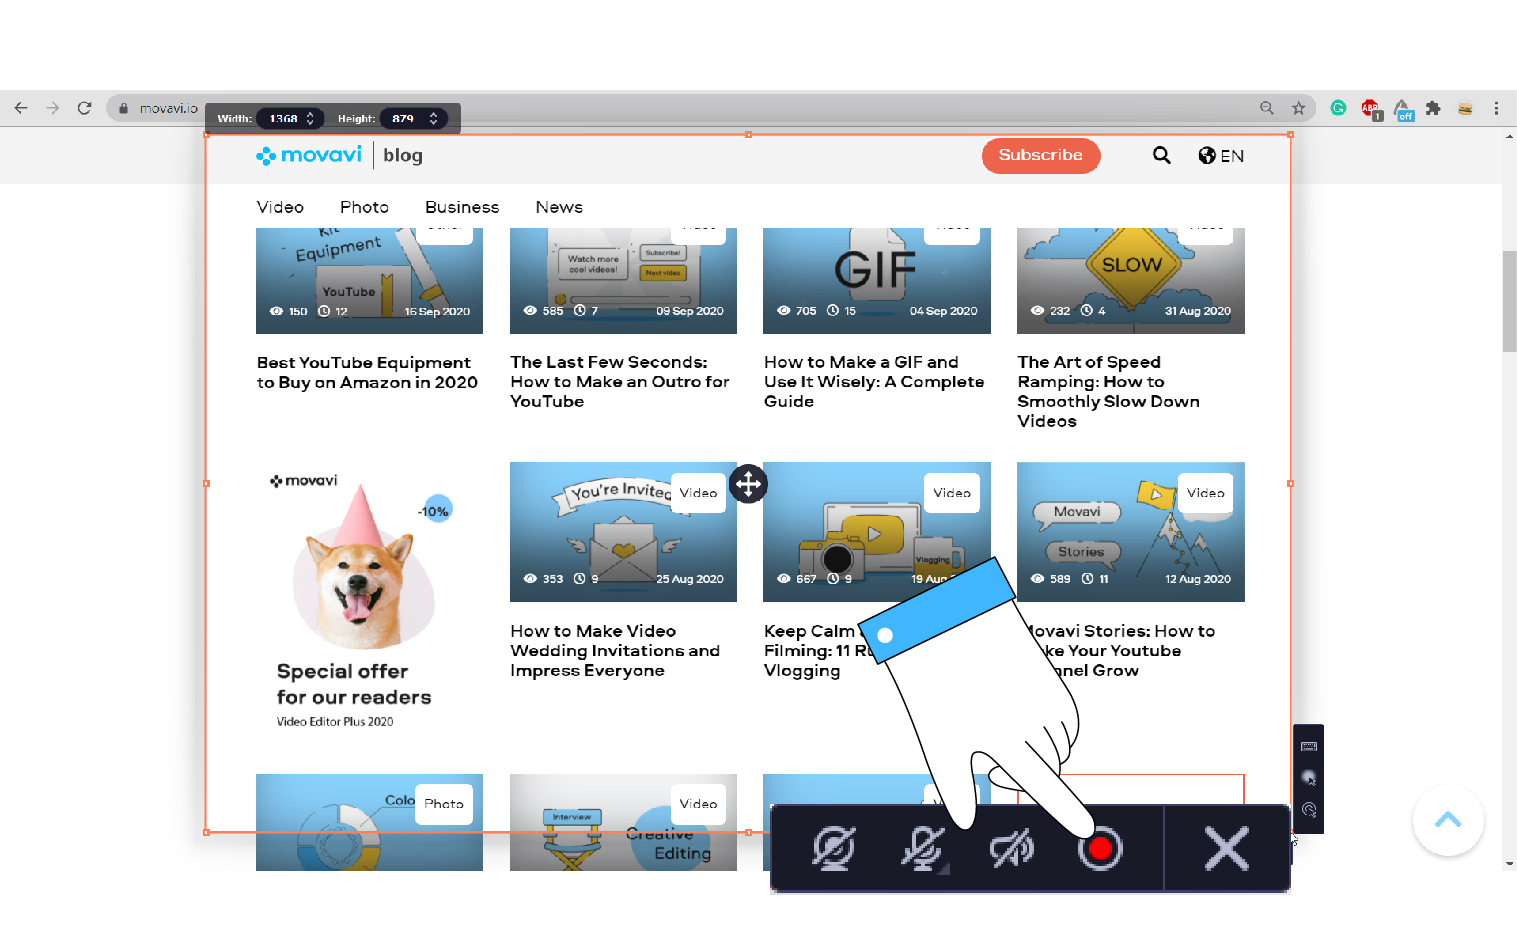
7. To end the recording, hit the Stop button.
8. Edit your video and save it to your computer.
By the way, we have a special discount on Movavi Screen Recorder for our blog readers. Use the promo code BLOG when purchasing the software and get 30% off! Or simply click on one of the buttons below:
If you decide to host a live webinar, you’ll need a special streaming software. Here are some of the options to help you make the choice.
For a better understanding of how webinar platforms work, here’s a quick guide to Webex.
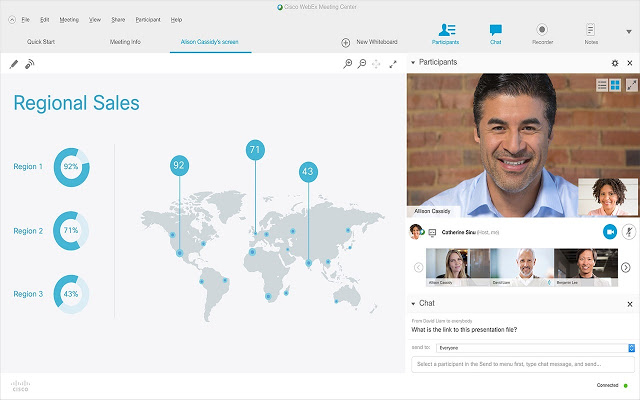
© Cisco Systems
To have the ability to record a Webex meeting, you will need first to install the WRF Webex Recording Editor.
Once you have launched your Webex meeting follow these steps:
Set up the recorder to save to the local computer:
Record the meeting:
You can stop, pause, and continue the recording as needed. To change the recording to a WMV file for Windows playback open the Webex Recording Editor, open and select your recorded Webex meeting, and then choose File > Export To from the menu.
Browse to the location where you stored the Webex recording and then click OK to start the conversion process.
Once the process is complete, you should now have a WMV file you can upload to your web server for others to download.
As with Webex, you can record a GoToWebinar session and save it to your hard drive for later uploading and viewing, but it also offers the option to record online directly. The online recording option will save the recording to the My Recordings page in your account.
GoToWebinar has the added advantage of being able to start a recording automatically. As many first time Webinar hosts can attest, this is a handy resource that eliminates the challenge of trying to remember to click start when the session begins.
Be prepared. Rehearse your speech at least twice before the stream. Prepare answers to questions that might appear during the class. There’s nothing less disappointing than a host that mumbles all the time. So yes, if you want to know how to host a webinar, here’s a simple answer: simple be well prepared.
Make it Interactive. Add some interactive elements to your webinar aside from the Q&A. When you ask questions to your viewers, it helps to keep their attention. You know those “raise your hand” moments on TED talks? You need something like that, too.
Promote your webinar wisely. Use all the sources you have to get people to know about your event. Email, social media, YouTube, ads, pop-ups on your website… use all kinds of marketing tools. Target your audience and explain how your webinar will make lives better!
Follow up. Prepare some bonus materials for your attendees: checklists, tutorials, question forms. Not only that will make your viewers happy, but also will remind them about your brand. Also, you can send them a PDF of your presentation, or a recording of the webinar.
That’s it. Good luck with all your webinars!