We use cookies to improve the services we offer you. By continuing to browse this site, you consent to keep them in accordance with our Privacy Policy.
×We use cookies to improve the services we offer you. By continuing to browse this site, you consent to keep them in accordance with our Privacy Policy.
×
 96
96
 10 min
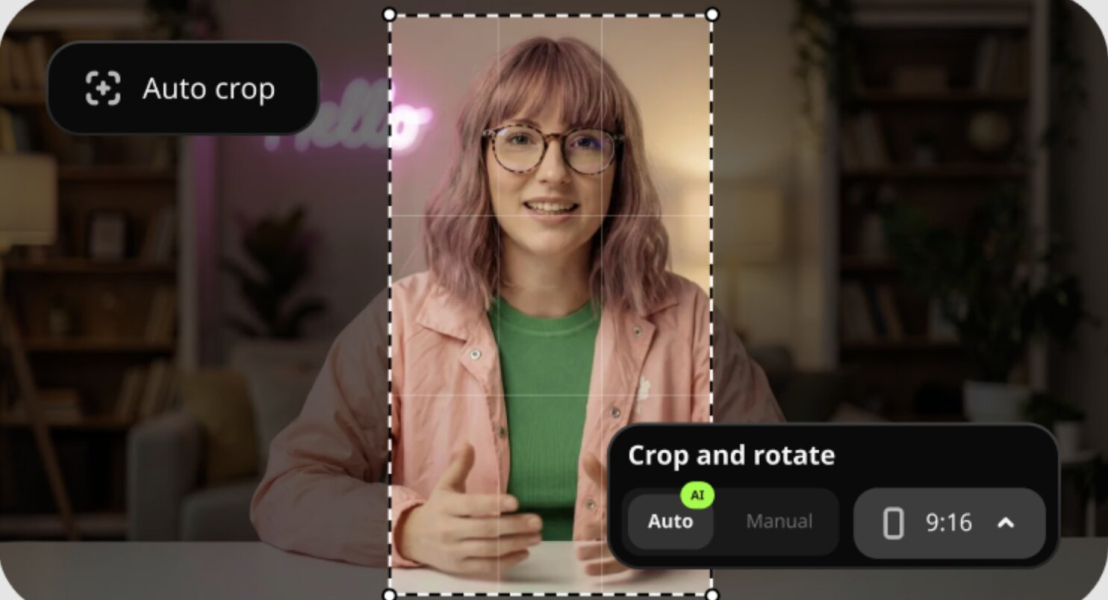
Learning how to change aspect ratio in iMovie is trickier than it sounds. Modern iMovie (version 10+) locks every project to a 16:9 canvas – there is no dropdown to switch to 9:16, 1:1, or 4:3. The built-in cropping tool lets you reframe footage, but it crops inside the 16:9 container, not resize the container itself.
To produce a true vertical 9:16 file (1080 × 1920) for TikTok, Instagram Reels, or YouTube Shorts, you need a workaround: either iMovie’s App Preview project type or a QuickTime Player rotation trick. This guide covers both the cropping method and the 9:16 workaround.
On a Mac, the only direct way to change the aspect ratio is through the Crop tool, which resizes the visible frame within the fixed 16:9 canvas. This removes black bars and fills the frame, but the exported file is always 16:9.
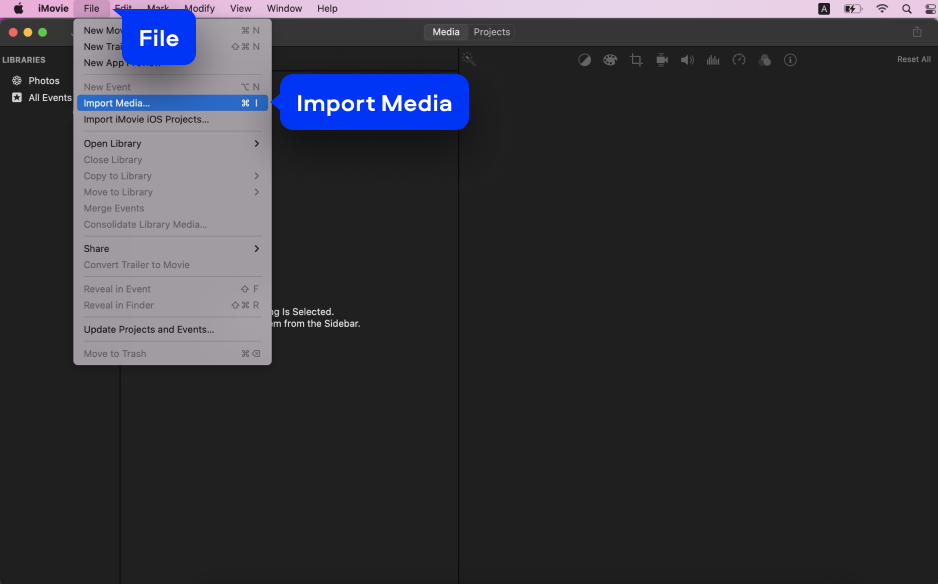
Open iMovie on your Mac. Create a new project or open an existing one. Click File > Import Media to import your video clip, or drag the file directly into the iMovie window. iMovie supports MP4, MOV, M4V, and other common formats. Drag the clip from the Project Media panel onto the timeline at the bottom of the window.
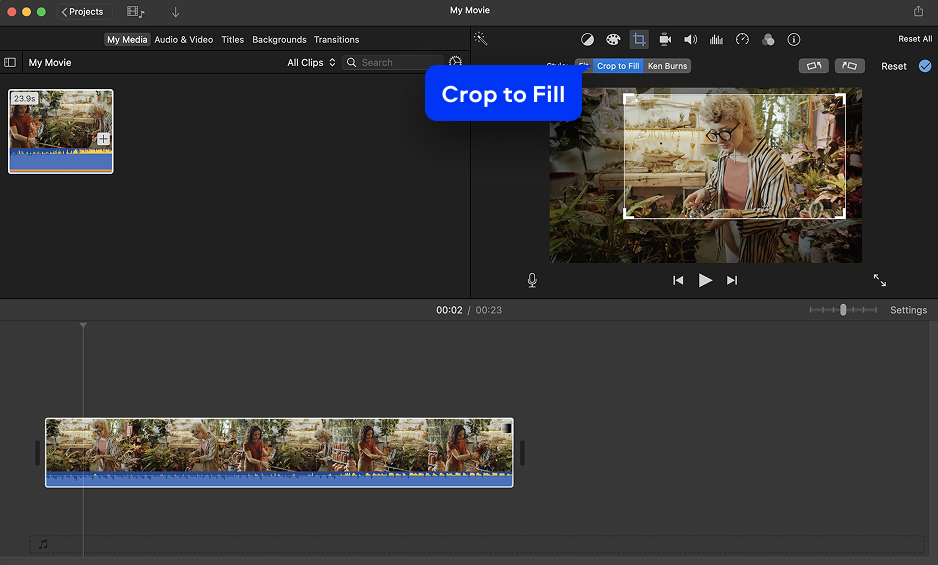
Click on the video clip in the timeline to select it. In the preview window toolbar at the top, click the Crop icon (it looks like two overlapping rectangles or a set of cropping marks). The controls appear above the preview: Fit, Crop, and Ken Burns. Select Crop to Fill to enlarge the video so it fills the 16:9 frame without black bars, or Fit to keep the entire frame with black bars on the sides for portrait footage.
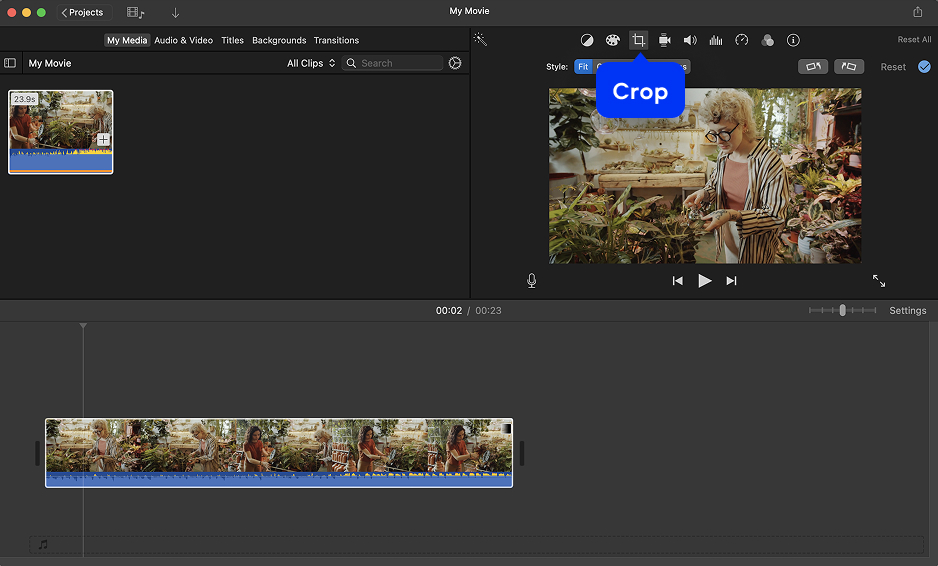
When Crop to Fill is selected, a yellow rectangle appears over the preview. Drag the corners and edges of the rectangle to define the crop area. Drag the rectangle itself to reposition the visible region. This is how you reframe vertical or oddly-shot footage to center the subject in the 16:9 output. When the crop looks right, click the blue check mark (Apply) in the top-right corner of the preview.
iMovie accepts the following video and audio formats for import.
| MP4 (H.264 and H.265/HEVC) – most common, fully supported |
| MOV (QuickTime) – Apple native, all codecs |
| M4V (iTunes video format) |
| MKV – limited support (H.264 content usually works) |
| AVI – limited support |
| AVCHD / MTS / M2TS (camcorder footage) |
| 3GP / 3GPP (mobile video) |
| DV (Digital Video) |
| 4K / ProRes (from Apple devices and cameras) |
| Audio: MP3, M4A, AAC, WAV, AIFF |
iMovie’s timeline is locked to 16:9. To export a true vertical 1080 × 1920 file, you need this two-part workaround using iMovie’s App Preview project type and QuickTime Player.
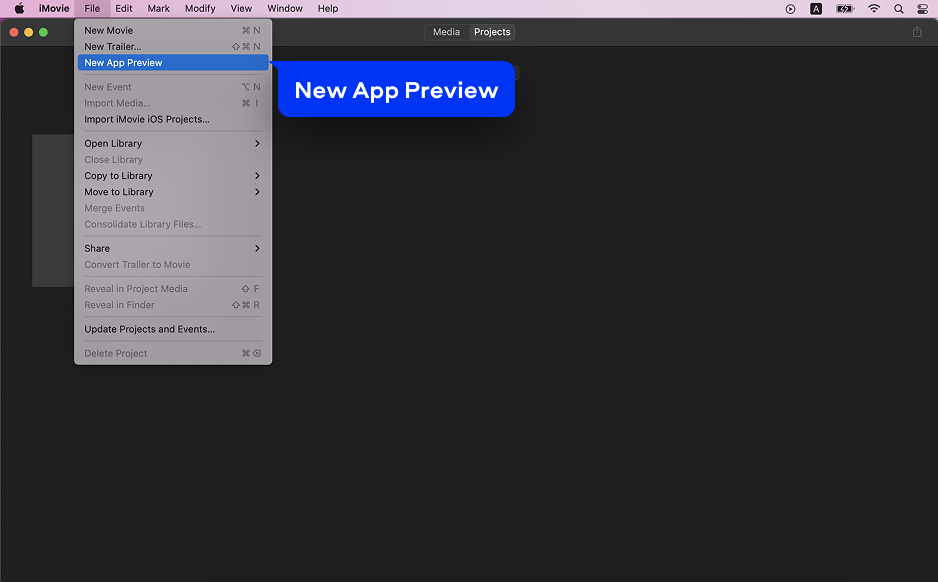
In iMovie, go to File > New App Preview. This creates a project type designed for portrait mode app store previews, which forces iMovie into a vertical 9:16 canvas. Add a vertical video clip or a portrait photo as the first item on the timeline to set the project ratio to 9:16, then drag your main footage after it. Delete the placeholder clip and use the Crop tool to center your subject in the vertical frame.
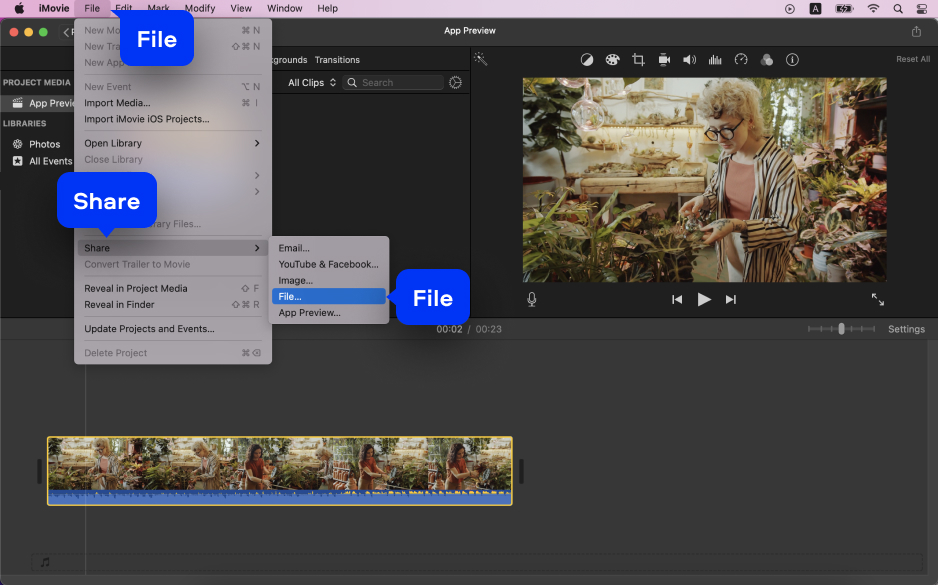
Click File > Share > File to export the project from iMovie. In the export dialog, select 1080p as the resolution. Open the exported file in QuickTime Player. Go to Edit > Rotate Left (or Rotate Right, depending on your clip’s orientation) to correct the rotation. Then go to File > Export As > 1080p to save the final vertical 1080 × 1920 file.
| 📌 Faster alternative: if the QuickTime workaround feels overly complicated, Movavi Video Editor (section 7) handles 9:16 and any other aspect ratio in one step with no rotation needed. |
iMovie exports to these video formats after aspect ratio adjustment.
| MP4 (H.264) – default export, widest compatibility |
| MP4 (H.265/HEVC) – smaller file size for 4K |
| MOV (ProRes) – via File > Share > Export File (high quality) |
| 4K (3840×2160), 1080p (1920×1080), 720p (1280×720), 480p |
| Direct share to YouTube, Vimeo, Facebook (via Share menu) |
| Note: native export is always 16:9. Vertical (9:16) requires the App Preview + QuickTime workaround |
❌ No aspect ratio selector: iMovie 10+ removed the File > Project Properties > Aspect Ratio menu. The only ratio is 16:9.
❌ No true 9:16 native support: vertical 9:16 output requires the App Preview project + QuickTime rotate workaround.
❌ No 1:1, 4:5, or 4:3 support: custom ratios for Instagram feed (4:5) or square (1:1) are not available in iMovie at all.
❌ Crop only, no canvas resize: every ratio change in iMovie is a crop inside the 16:9 canvas, not a true canvas resize.
Movavi Video Editor is the practical alternative to iMovie for changing aspect ratio. It includes a one-click canvas resize to any standard ratio – 16:9, 9:16 (vertical), 1:1, 4:3, 4:5, and custom dimensions – with no workarounds, no QuickTime rotation, and no crop-only restriction. Works on footage from any camera or device.
Movavi Video Editor is available on both Windows PC and Mac, making it the right tool for creators who work across platforms or need ratios iMovie simply doesn’t support.
| 🏷️ Save on Movavi Video Editor
Use a Movavi promo code at checkout and save on your license. Check current promo code → |
Three steps from any footage to a true vertical 9:16 or any other ratio on your Mac or Windows PC.
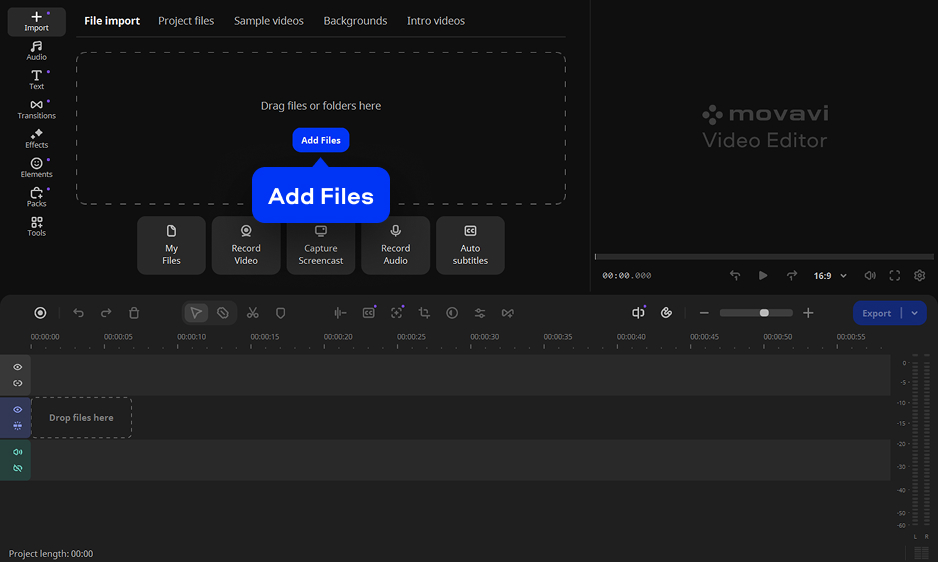
Download and install Movavi Video Editor for Windows or Mac. Open the app and click Add Files to upload your video. Drag it onto the Timeline at the bottom of the screen.
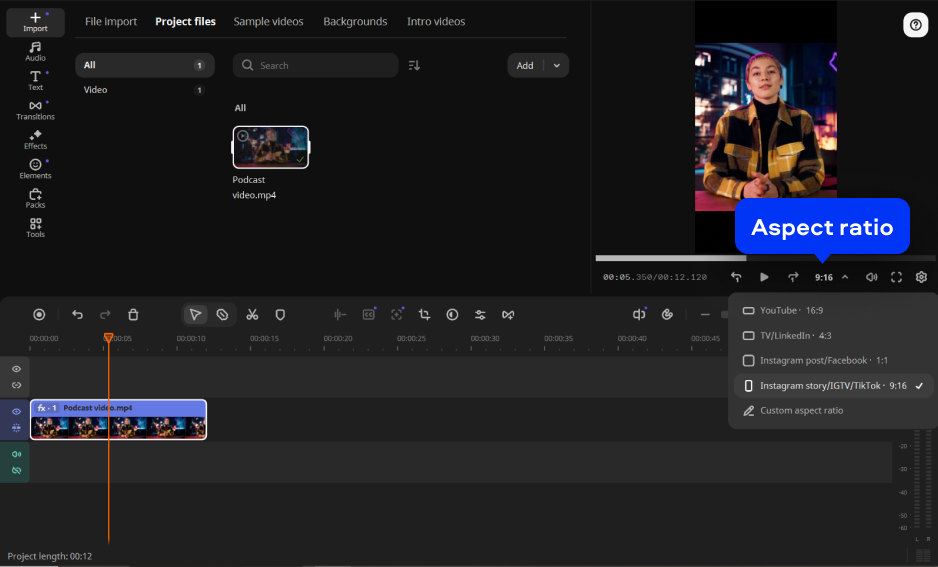
In the Aspect ratio dropdown list under the preview window, select your target ratio: 9:16 for TikTok/Reels/Shorts, 16:9 for YouTube, 1:1 for Instagram feed, or Custom aspect ratio to type in specific dimensions (e.g., 1080 × 1920 for 9:16). The preview canvas immediately resizes to the new ratio.
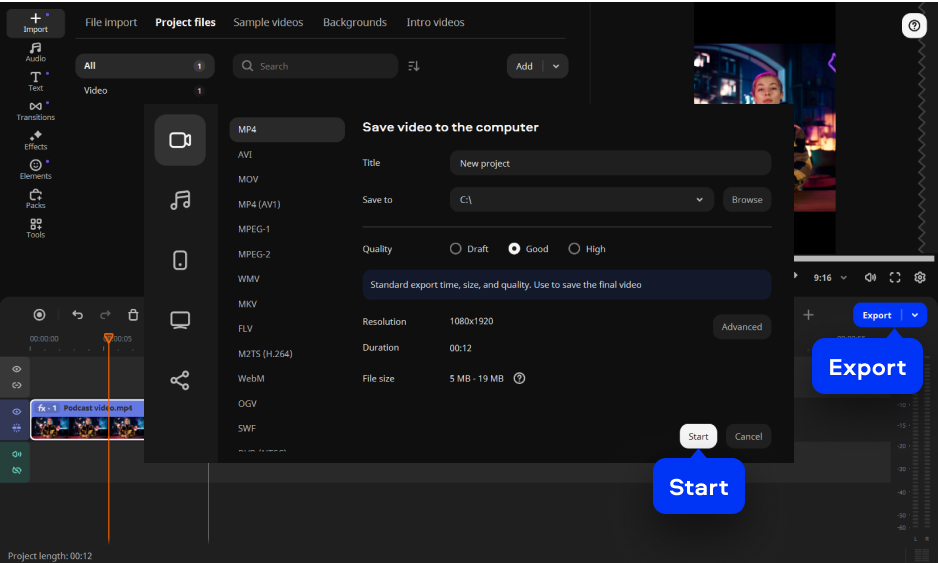
When the framing looks right, click Export. Choose the output format, pick a save location, and click Start.
| ▶️ Video tutorial – Movavi channel
How to turn horizontal video into vertical |
Changing the aspect ratio in iMovie means cropping within a fixed 16:9 canvas using the Crop to Fill tool. To get a true vertical 9:16 file, the App Preview project + QuickTime Player rotation workaround produces clean results without quality loss.
When you need true canvas resizing to 9:16, 1:1, 4:5, or any custom ratio without workarounds, Movavi Video Editor handles it in three clicks on both PC and Mac. Download the free trial and produce the correct ratio for every platform from the same source footage.
To resize a video in iMovie on a Mac:
This resizes the visible frame by cropping – the output file is always 16:9. For a true canvas resize to a different ratio – like vertical 9:16 for TikTok – use the App Preview workaround described in Section 3, or use a dedicated tool like Movavi Video Editor, which resizes the canvas in one step without cropping workarounds.
iMovie cannot natively export a true 1080 × 1920 vertical file from its standard project mode.
Here’s the workaround:
The result is a 1080 × 1920 vertical file. Alternatively, import your 1920 × 1080 file into Movavi Video Editor, set the aspect ratio to 9:16, reposition the clip, and export – no rotation tricks needed.
iMovie’s standard project type is fixed at 16:9 and does not have a 9:16 ratio option.
Here’s the cleanest way to set vertical 9:16 in iMovie:
For a simpler approach without any workaround, Movavi Video Editor includes a 9:16 preset that sets the canvas directly, works on Mac and Windows PC, and is free to try.
iMovie forces every project to a 16:9 canvas. When you import a clip with a different aspect ratio – such as a vertical 9:16 video, a square 1:1 clip, or a 4:3 recording – iMovie either adds black bars (letterboxing or pillarboxing) or crops the edges to fill the 16:9 frame, depending on whether Fit or Crop to Fill is applied. This is iMovie’s default behavior and cannot be turned off in the current version. The resolution of the first clip you import sets the project resolution (e.g., 4K or 1080p), but the ratio always stays 16:9. If iMovie is cropping your footage unexpectedly, check the Crop setting on each clip (click the Crop icon in the preview toolbar) and switch it from Crop to Fill to Fit to show the full frame with black bars instead.