We use cookies to improve the services we offer you. By continuing to browse this site, you consent to keep them in accordance with our Privacy Policy.
×We use cookies to improve the services we offer you. By continuing to browse this site, you consent to keep them in accordance with our Privacy Policy.
× 1,463
1,463
 10 min

The invention of the smartphone permanently changed the field of photography—no longer was it to be the domain of the dedicated hobbyist—but something open to anyone with a pocket-sized device.
Of course, snapping a picture is just half of the equation, and the best photographers can spend hours fine-tuning their art in photo editing software. For some, the thrill of photo editing is their favorite part of the process, and their skills in enhancing and modifying pictures can earn them serious money as a freelance gig.
For all its joys, becoming a photo editor is an undeniably steep learning curve. It’s not just about mastering your editing software’s toolset, but also about getting to grips with business management. If they are to generate reliable income, freelancers must market their talents, attract (and nurture) a wide pool of clients, manage their own finances, and more.

Free to use image sourced from Unsplash
Mastering an editing software is the cornerstone of a successful freelance photo editing career.
The “industry standard” is to learn the Adobe Creative Cloud Photography apps—namely, Photoshop and Lightroom. These tools have slightly different purposes, but they’re both worth adding to your arsenal of editing skills. Let’s take a quick look at the key differences:
When getting started, begin with the fundamentals, like exposure correction and color adjustments, gradually progressing to advanced techniques such as retouching and compositing. As your skills develop, you can then learn more specialized software, for example when editing RAW or HDR images. Alternatively, if your budget is tight, you could consider using a free Lightroom alternative like GIMP or Apple Photos.

Free to use image sourced from Unsplash
A portfolio is like your online calling card, so keeping it well-maintained is key to proving that you’re serious in attracting new clients.
Compiling this for the first time can be tricky if you don’t have a large library of examples. The key is to get into a regular upload cadence—updating your ‘latest’ section constantly to showcase your continuous growth. It’s important to show off different aspects of your work; portraits, landscapes, objects, daytime, nighttime, computer-generated art, etc.
Now would also be a good time to talk your website visitors through the techniques that you have applied to each image. Remember, quality is more important than quantity, so highlight your best pieces and most prestigious clients to boost your credibility.
As a photo editor, building a website that looks aesthetically pleasing will be one of your top priorities. The reason? Because if you can get a website to look nice, you’ve already achieved the goal of proving your design skills are up to scratch. Additionally, integrating essential tools like a booking software for photographers into your site can streamline the process of managing client appointments. This way, your clients can easily schedule sessions, giving you more time to focus on your craft while maintaining a professional, organized business front.
To get started, it might be easier to go with a website builder platform, such as with WordPress, Wix, or Squarespace. Then, you can select a portfolio template, upload your photos, and tinker with the style to match your desired brand.
A good idea is to also include a blog section, where you share personal insights and industry knowledge. Here, you can really craft a story of how your photo editing career has developed, the skills you have picked up along the way, and what you hope to achieve next. Showcasing this professional development is vital for attracting high-value clients and recurring contracts.

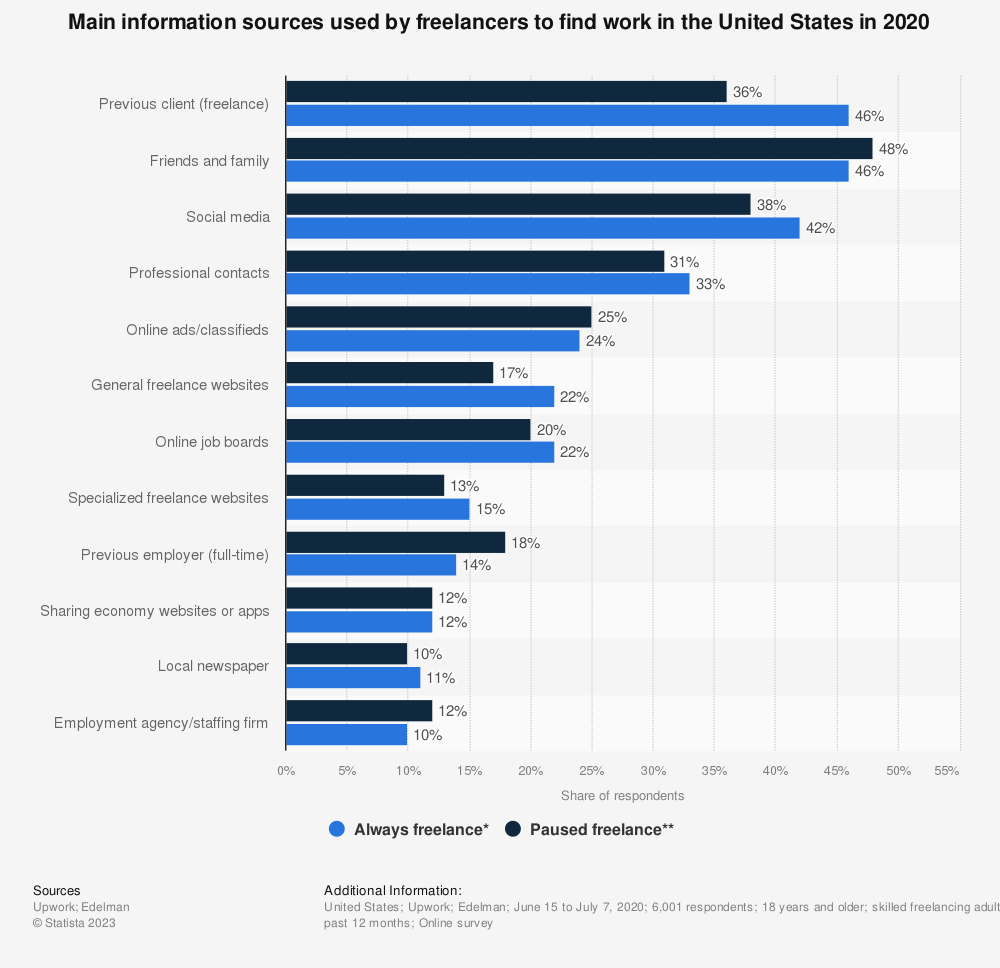
Image sourced from Statista
No matter whether you’re a starter or an expert, if you don’t have the right equipment, you won’t get anywhere with photo editing.
For starters, you’ll need a decent computer and a calibrated monitor for accurate color representation. If your budget allows, try upgrading this to a wide gamut monitor, as it’ll display a wider range of colors and a more true-to-life image. Depending on whether you prefer to use a mouse or stylus input, you could also buy a graphics tablet to use alongside this setup.
Depending on your jurisdiction, you may have to register your freelance work as a sole business operation. Check on your local authority’s website whether you need to tell them that you’ll be working from home, in case you require a home business license. This step is boring, but it’s crucial to stay compliant with local tax and administrative laws.
Other than that, just make sure that you always have permission to shoot in your photography locations, else uploading them to your website could invite legal action from an aggrieved party.
As with any source of income, it’s important to work out how valuable your skillset truly is. This will allow you to charge a rate that is fair to your ability, but not so steep that it might put off any potential leads.
When getting started, try searching for other freelance photo editors in your city or region, and try to determine what the prevailing market rate is. Usually, clients will pay on completion of a project, so be honest with them if you think a particular project will take more effort than usual. Both you and your client may want to negotiate, so try to keep an open mind.
Over time, seasoned editors should periodically reevaluate their rates to stay competitive and align with their level of expertise. The moral of the story is: Don’t undervalue your skills, charge what you’re worth!

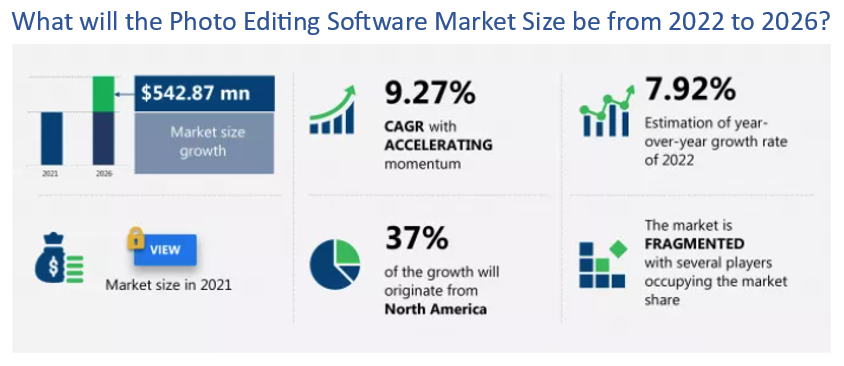
Image sourced from TechNavio (edited by writer with more accurate header text)
From the outset of your freelance photo editing career, you should develop a clear system for tracking income and expenses. Not only will this allow you to plan your monthly budgets and how much work you need to be completing, but it will also make tax reporting much easier at the end of the financial year.
Don’t forget to consider the expenses associated with these tasks as potential tax deductions at the end of the fiscal year, which can preserve much of your earnings as a sole proprietor. If you’re based in the USA, you can refer to the IRS resource on tax credits.
Or, if you’re reporting taxes to the HMRC in the UK, you can check out this page on self assessment tax software.
Finding new clients is all about having—the more people who view your website and portfolio, the higher likelihood that you’ll convert them into a paying customer.
To drive more impressions on your website, it’s a good idea to set up social media profiles for your business on the major platforms. Websites like Instagram work particularly well, as they have a clear profile page for displaying your photos. If you’re trying to score higher-paying clients, then LinkedIn could be a good place for showing off your professional accolades.

Free to use image sourced from Unsplash
Efficient invoicing will save you so much time on a crucial point of your photo editing career—actually getting paid. Either use an invoice template or create your own that clearly outlines payment terms, including details like due dates and late terms.
If numbers aren’t your strong suit, you can rely on technology to lighten your workload. For instance, payment providers like PayPal can help speed up invoice payments, with reminder notifications and an intuitive interface. Then, just integrate with an accounting for freelancers platform to view your earnings as generated reports and better plan your finances.
Have you set up everything—your website, portfolio, and social accounts—but the clients still aren’t rolling in?
One option is for you to join a freelancing community where you can market your services to a more targeted audience. Platforms like Upwork, Fiverr, and Toptal are great places for achieving exposure and finding new clients. Or, if that’s not an issue, you may still want to join photo editing forums to build connections with peers and learn more about the industry.
Learning how to become a freelance photo editor is a process that will take time, and as best as we’ve tried to cover it, you’ll need to give it a shot yourself to understand the trials and tribulations of the career.
That said, there are several key areas that beginners often forget about when getting started. Try to sort these out before anything else, to save yourself time and a headache later on down the line:
Once you’ve got these basics nailed down, all it takes is dedication to design and a willingness to learn new things. Creators on YouTube or blog sites will be your friends—use their knowledge of working in the industry to your advantage, so you know industry trends and best practices. Good luck!