Take advantage of our special 10% discount for all our blog readers!
We use cookies to improve the services we offer you. By continuing to browse this site, you consent to keep them in accordance with our Privacy Policy.
×
 11,476
 12 min
Film editing, even simple things, can be a little difficult. If you have ever wanted to speed up a video’s playback rate on a Mac, you will probably have found just how tricky it can be. No matter the steps involved, the end result is a lot of fun, so let’s take a look.
Depending on the type of file you are working with, there are a number of ways you can go about it and many options of the software you can use. iMovie is an app available for free on Mac and iPhone devices, so let’s take a look at how to use it. Please take a moment to download and install the application, and let’s get started.
First, take a quick look at the program to get an overview of what it can do. With iMovie, you can speed up and slow down your videos, add titles, apply filters, and so on.
Since all we are going to do is manipulate the playback speed, we can ignore the software’s other options. Now, if the format of your video file is incompatible, you might need to convert it to a type of file iMovie recognizes. You can do this with a converter program, one of which is built-in to an alternative piece of software mentioned below. iMovie can convert a few types of files, though, so you should be OK as long as you convert from one common type to another.
It will not matter whether you are making a humorous clip or a montage, iMovie can create various areas of different speeds or just adjust the entire thing. Let’s make sure that you have a video worth speeding up while we are setting up. Is it action-packed or will it after a speed up? Not just one movement, such as someone walking, but a variety of motions: walking, slipping, falling, and getting back up. In any case, we should work with something longer than 30 seconds at least, or the increased speed will usually render your video into a meaningless blur. The longer the video, however, the faster the playback should be.
Here’s how to adjust the speed of your clip in iMovie:
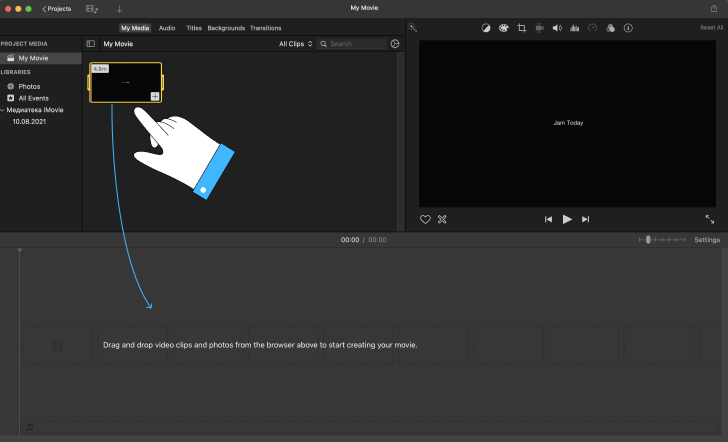
1. Open iMovie on your Mac. If it’s not installed on your computer, open your browser, go to App Store, download the app and install it first.
2. Next, you need to upload the video clip you want to speed up to the app. Drag and drop your video file into the Timeline. You can also add it manually by clicking the Open button.
3. Above the viewer, you should see a Speed button. Click this button to access the drop-down menu.

4. Choose Fast from the drop-down menu that opens.
5. Next, select the needed speed for your video. You can select 2x, 4x, 8x, or 20x normal speed. You can also input a custom number.
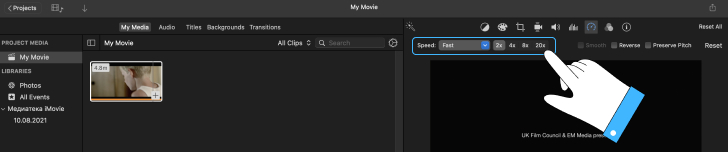
We’d recommend choosing one of the preset speeds instead of inputting a custom number. Since some of the users have reported problems with the speed of the soundtrack. At the very least, make sure to review the soundtrack of the finished product before exporting if you’ve decided to apply a custom speed.
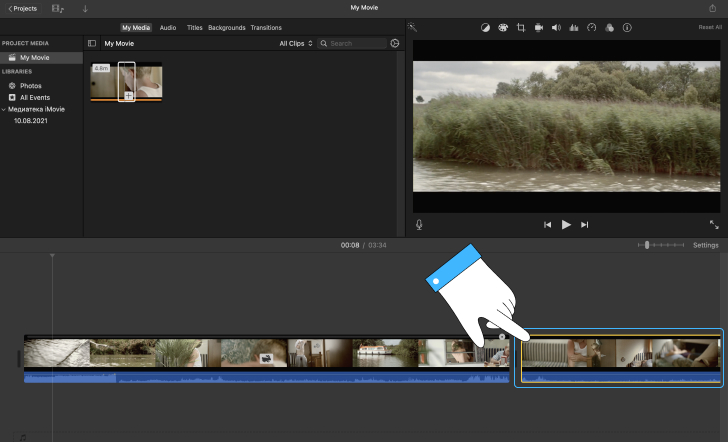
6. To add different speeds to the same video, click Add and Range.
7. More sections can be added by adjusting the size of the yellow effects box and inserting more.
8. When you finish editing, don’t forget to save the edited video.
We’ll take a look at versions 9, 10, and 11 of iMovie. Though these versions are similar to one another, there are enough changes between iterations to make the details stack up.
There are two options for changing the speed of your video – you can change the speed of a whole video or only a selected part of your clip. Check out the small guides below to learn the differences in changing video speed.
After you’ve uploaded your video file to the app, from the Menu bar at the top of the screen, select Modify. Then choose Fast Forward to change the speed of the clip itself.
You can also choose to slow it down or add freeze frames. Adjust the length of the playback rate in the Timeline and alter the speed of just one part of the clip by adjusting the length of the Range box, then clicking outside the box and adding more. The steps above are used for slo-mo and still frames, as well. Choose different effects or click it from the drop-down under Modify in the menu bar.
The iMovie program can be used from various devices, not just the desktop (which we have just covered), but the iPhone and iPads, too. The paths are similar enough. However, the touch screen interface makes the editing process a bit different.
Here’s how to speed up a video on iMovie for iPhone and iPad:
Download and install the app from the App Store. Launch it after the installation is complete.
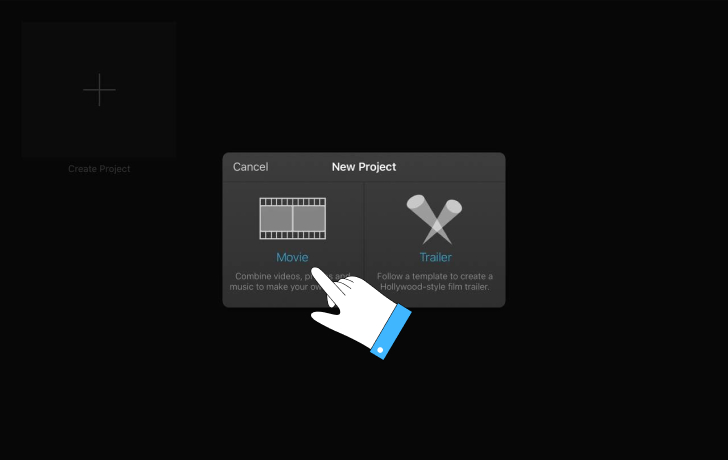
On the Projects page, press the + symbol to create a new movie.
In the New Project window that pops up, tap Movie.
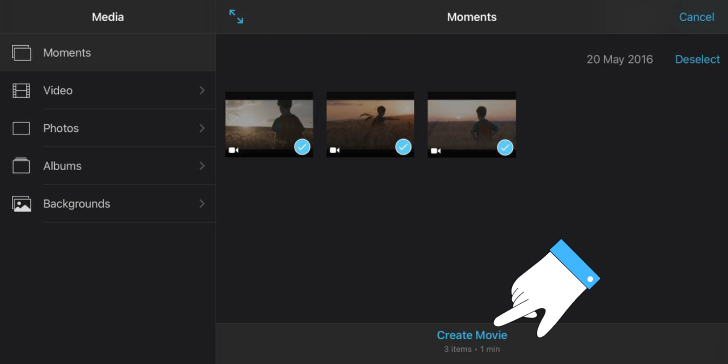
From this screen, select the video you want to speed up.
Hit Create Movie in the bottom middle.
Tap the clip in the Timeline, press the Speed tool in the video editing tools that appear.
Swipe the slider right to speed up the video or left to add slow-mo.
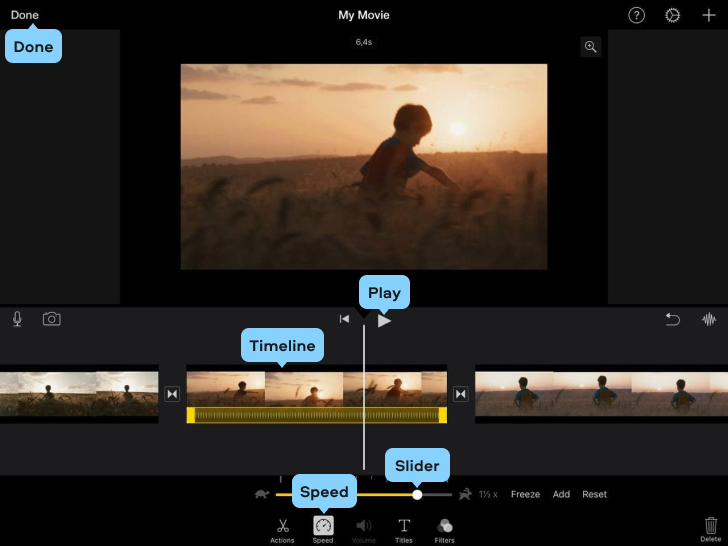
Tap Play to preview the finished product and then Share to save it.

If you need to remove a speed-adjusted section or simply want to revert back to the native footage, you first want to open the adjusted file in iMovie. Find the Range box, which contains the Speed Up instructions you created above, and drag it off the Timeline. Similarly, you can select the Range box and press Delete on your keyboard. Removing the Range box leaves you with the original film, ready to be readjusted or enjoyed in its original form.
That’s it for Apple. It can be helpful to look at another software if you want options or if the iMovie app doesn’t function the way you would like it to. So, in the next section, we’ll look at Movavi Video Editor Plus.
As an alternative program to iMovie, we have selected Movavi Video Editor Plus because it does what we need it to and is a respected, trusted piece of software.
Besides being easy to use and free to try, Movavi is cross-platform, meaning it will play nice with both PCs and Macs. Movavi Video Editor Plus also offers a wide range of features applicable to both video editors or social media users. To learn how to change the video speed with Movavi Video Editor Plus, follow the steps below.
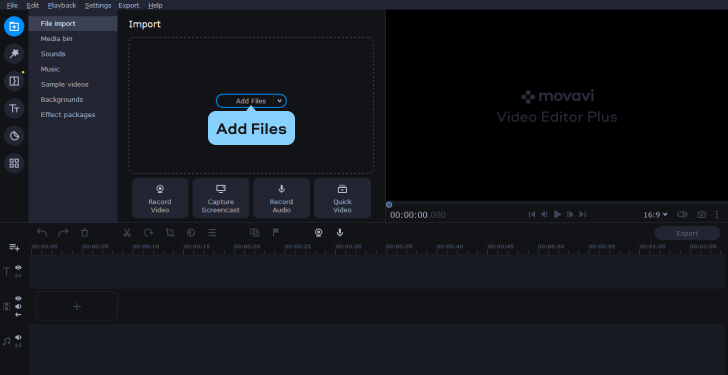
1. Download and install Movavi Video Editor Plus following the on-screen instructions. Launch the program.
2. To upload your video file, click the Add Files button, select your files and click Open.
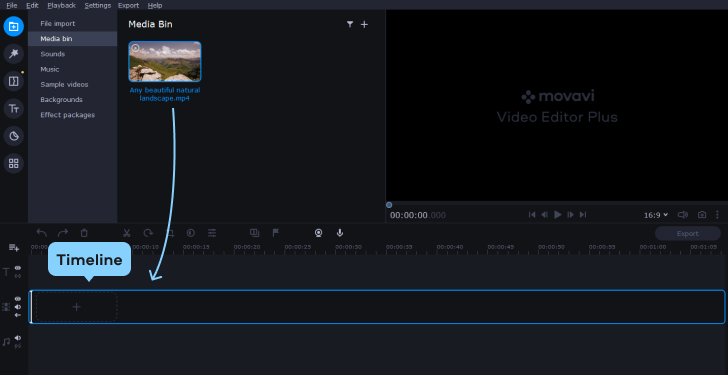
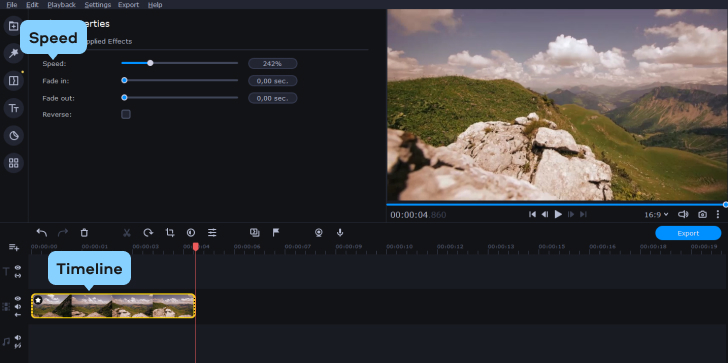
3. The selected file appears in the Media Bin. Drag and drop the video to the Timeline.
4. To change the speed of your video, double-click your clip on the Timeline. In the Clip Properties, drag the Speed slider to the right to speed up your video.
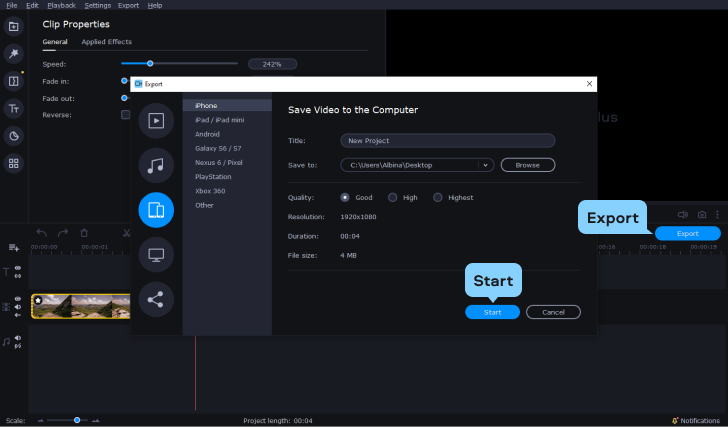
5. To save your video, click the Export button. Specify the saving settings and click the Start button.
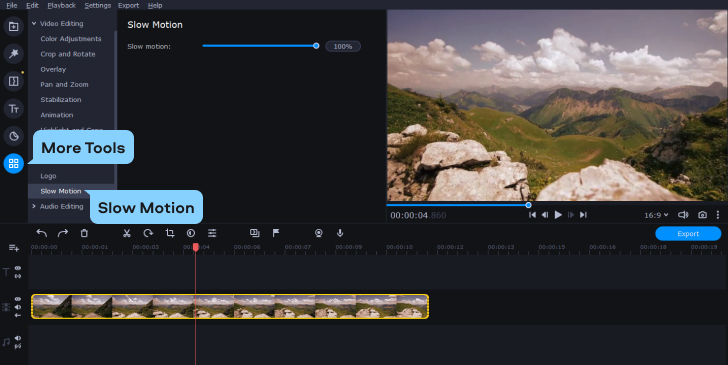
6. You can also slow down your video using Movavi Video Editor Plus. To do this, open the More Tools tab and find the Slow Motion effect. You might want to take a look around at the other options here, too. You can find there a screen recording feature, more effects, titles, transitions, and stickers you can add to your video.
Movavi makes compatibility easy, recognizing and reformatting more types of video files than iMovie. So you don’t have to juggle version compatibility, manage a separate file format converter, or use another piece of software for titles, effects, and decorations when using Movavi. Nifty features aside, the functions of speeding up and slowing down offer a more dynamic range with fewer problems: custom speeds glitch out less often, giving you a playback free of soundtrack errors.
Think about everything you want to do with shareable videos. iMovie makes speed changes pretty straightforward, and the Apple suite of products is all designed to work together. While some compatibility issues arose when sending files between various workstations, none of the Mac desktops wound up having a problem with any of them. Locking into the Apple brand of products can feel limiting, though that limit is meant to ensure as stable and secure an operating environment as possible.
Make sure and consider all of the places you want your edited movie to go. Social media platforms all have different limits and file type requirements. It has never been easier to edit and share multimedia content and this one task might inspire a whole string of creative ideas! Let’s hope your grasp has now been extended, helping you reach your goals.
If you don’t want to limit yourself to iMovie, you can also try an alternative – there are a lot of powerful video editors available on the market that will let you change the video speed easily. One of the examples is Movavi Video Editor Plus – a handy video editor with a set of powerful video-editing tools. Using it, you can speed up or slow down your video clip in a matter of minutes!