We use cookies to improve the services we offer you. By continuing to browse this site, you consent to keep them in accordance with our Privacy Policy.

×

How to Screen Record on Mac (MacBook Air/Pro, iMac) – 7 Ways

May 05, 2023
  • 2,865
  • 8 min

Sometimes you may want to record some content on your Mac screen like streaming videos, instructional tutorials, or other activities. Wonder how to screen record on Mac? This post introduces some professional screen recorders for Mac and offers detailed guides.

Way 1. Use Movavi Screen Recorder

Movavi Screen Recorder is an easy-to-use screen recorder for Mac that lets you capture everything on your screen in one click. You can use this tool to easily record streaming videos, online events, webinars, online calls, video instructions, tutorials, and more. Movavi Screen Recorder is compatible with macOS 10.10 or later. Check how to screen record on Mac with Movavi Screen Recorder below.

  1. Download and install Movavi Screen Recorder from its official website on your MacBook Air, MacBook Pro, etc.
  2. Launch the program. Choose the capture area and adjust the recording settings.
  3. Optionally, you can turn on the audio recording or mic recording to record the screen on Mac with audio. You can also record the screen with your webcam if you like.
  4. Hit the Record button to start recording content on your Mac screen.
  5. After you finish recording, you can edit the recorded video with simple editing tools included in the software. You can cut unwanted parts, add titles to videos, etc.

Way 2. Use Tella Screen Recorder

Tella.tv is a powerful webcam & screen recording app, available on the web, as a Chrome extension and a Mac app.
Here’s how to use Tella.tv for screen recording on your Mac.

  1. Visit Tella’s website and click on “Get Started” to sign up.
  2. Once logged in, click on the “New Video” option. Tella will guide you through the setup process.
  3. Select your recording preference. With Tella, you have the flexibility to record your entire screen, a specific browser tab, or even a webcam feed.
  4. Once configured, start your recording. Tella sets itself apart with its “clip-by-clip” recording feature, allowing you to capture your video in bite-sized segments.
  5. Immediately after completing a clip, you have the option to preview it. If it doesn’t meet your expectations, feel free to re-record.

Tella empowers you to fine-tune your clips by trimming and rearranging them, zooming in parts of the screen, changing camera layouts, adding a background image, etc.
Tella offers a new approach to video recording & editing, with more flexibility and control over the content. It’s a great option if you want to create polished videos without using complicated editing software.

Way 3. Use Mac built-in screenshot app

Mac OS has a built-in free screencast and screen recording app named Screenshot. You can use the Mac Screenshot app to easily take a screenshot on Mac or record your Mac screen.

The Mac Screenshot app provides a set of options to let you capture or record anything you want. You can capture the entire screen, capture a window, capture any portion of the screen, record the entire screen, or record a portion of your Mac screen.

The Screenshot app is available in macOS Mojave or later. Check how to use it to record the Mac screen below.

  1. Press Shift + Command + 5 to open the Screenshot app on Mac.
  2. Select a screen recording mode like Record Entire Screen or Record Selected Portion.
  3. Click the Options button to adjust the record settings, like setting a timer if you want.
  4. Click Record to start recording. Click Stop Recording in the menu bar to stop the recording process when you want. The recordings are saved as .mov files.

Alt=Mac built-in Screenshot app

Way 4. Use QuickTime Player to screen record on Mac

You can also use QuickTime Player to screen record on your Mac. Check the detailed steps below.

  1. Go to Finder > Applications, and click QuickTime Player to open it.
  2. Click the File tab in the top menu bar and select New Screen Recording (or press the keyboard shortcut Command + Control + N).
  3. Click the down-arrow icon next to the Record button to adjust the recording settings like recording internal microphone audio, showing mouse clicks in recording, etc.
  4. Click the Record button.
  5. Choose the area of the screen you want to record by clicking and dragging the cursor. To record the whole screen on Mac, you can click anywhere on the screen.
  6. Click the Start Recording button.
  7. When you’re done recording, click the Stop Recording button in the menu bar or press the Command + Control + Esc keyboard shortcut.
  8. The recorded video will be automatically saved as a .mov file. You can then edit, save, or share the recording as you like.

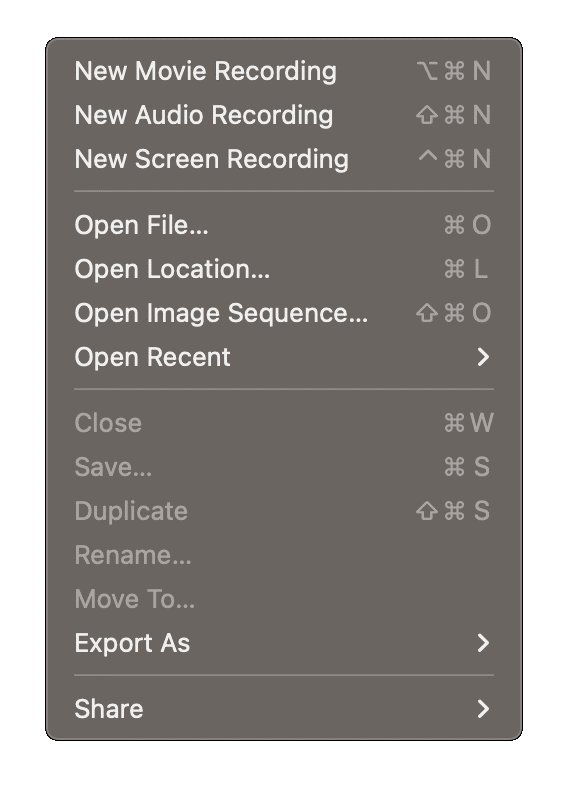
Alt=use QuickTime to record screen on Mac

Way 5. Use a Free Online Screen Recorder

You can also use a free online screen recorder to record screen on your Mac. One of the most popular tools is Screen Capture.

You can use this tool to capture your browser activity or computer desktop. It also allows you to record computer screen with sound, including your voice and computer system audio. If you want, you can also record a webcam video with the screen recording.

  1. Go to www.screencapture.com to access this online screen recording tool.
  2. Choose the options that you want to record along with the screen. You can tick Microphone, Sound, or Webcam if you like.
  3. Click the Start Recording button to begin recording your Mac screen.

The drawback of this free online recorder is that it doesn’t let you select the capture area, and the recorded video will have a watermark. If you like, you can choose to download its desktop app to remove the limits and unlock all the advanced features.

Way 6. Use ApowerREC to Record Mac Screen

Another top third-party screencast software application for Mac you can try is ApowerREC. ApowerREC is an all-in-one screen recorder and video editor for macOS,  Windows, Android, and iOS. You can use it to capture and create high-quality video tutorials, presentations, etc. It allows you to easily record screen, record webcam, record audio, edit video, and add annotations to videos on your Mac. Learn how to use this tool to record your Mac screen below.

  1. Download and install ApowerREC on your Mac computer.
  2. Launch the software and select a recording mode.
  3. Select the target area of your screen that you want to record by dragging the crosshairs around the desired area.
  4. Click OK to start recording your Mac screen.
  5. When it finishes recording, you can click the “Stop” button to end the recording.
  6. Once the recording is complete, you can edit and customize the video using the editing tools.
  7. After editing, you can save the video in your preferred format.

Way 7. Use Vmaker to record your screen on Mac

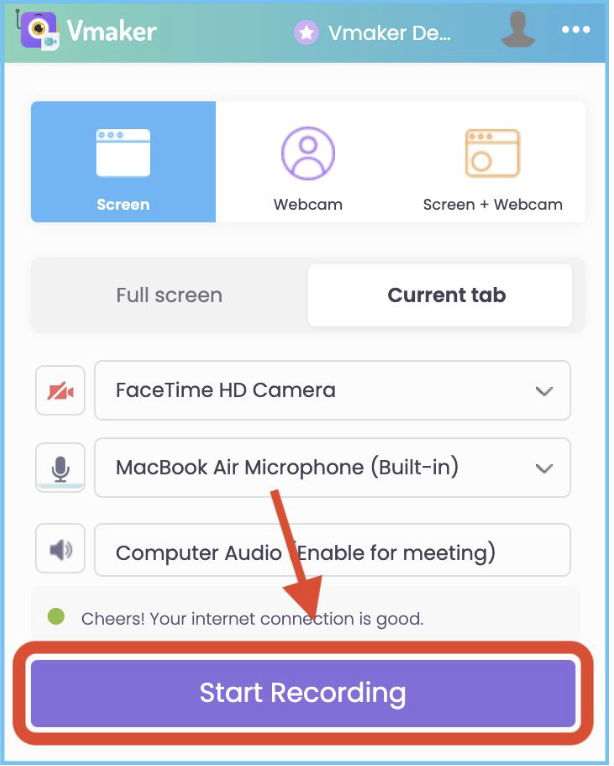
 Vmaker is a simple yet powerful Mac screen recorder that can be used to record your screen and webcam with audio. It comes with an in-built video editor and provides unlimited cloud storage.

 You can use this tool to record unlimited number of training videos, tutorials, presentations, gameplays, product demonstrations, and more.

 Check out how to screen on Mac using Vmaker below.

  1.  Sign up for Vmaker and download the Mac application to your device.
  2. Give the necessary permissions and launch the application.
  3. Set your recording preferences by choosing your recording mode, audio inputs, and recording area.
  4. Click on the ‘Start Recording‘ button whenever you’re ready.
  5. When you’re done, click on the red-dock button on the left-handed side of your screen to stop the recording.
  6. If necessary, edit your recording by clicking the ‘Edit’ button on the player page.
  7. Export the video at standard HD quality and share it with others.

Conclusion

In conclusion, this post introduces 5 ways to help you easily record your Mac computer screen. You can use the Mac built-in Screenshot app or QuickTime Player to screen record on Mac for free. Or you can use some third-party tools like Movavi Screen Recorder, ApowerREC, or Screen Capture to easily capture your Mac screen. Now you can go to record whatever you want on your Mac display.

Join for how-to guides, speсial offers, and app tips!